Archive for the ‘Snacks & Starters’ Category

DSC_1130

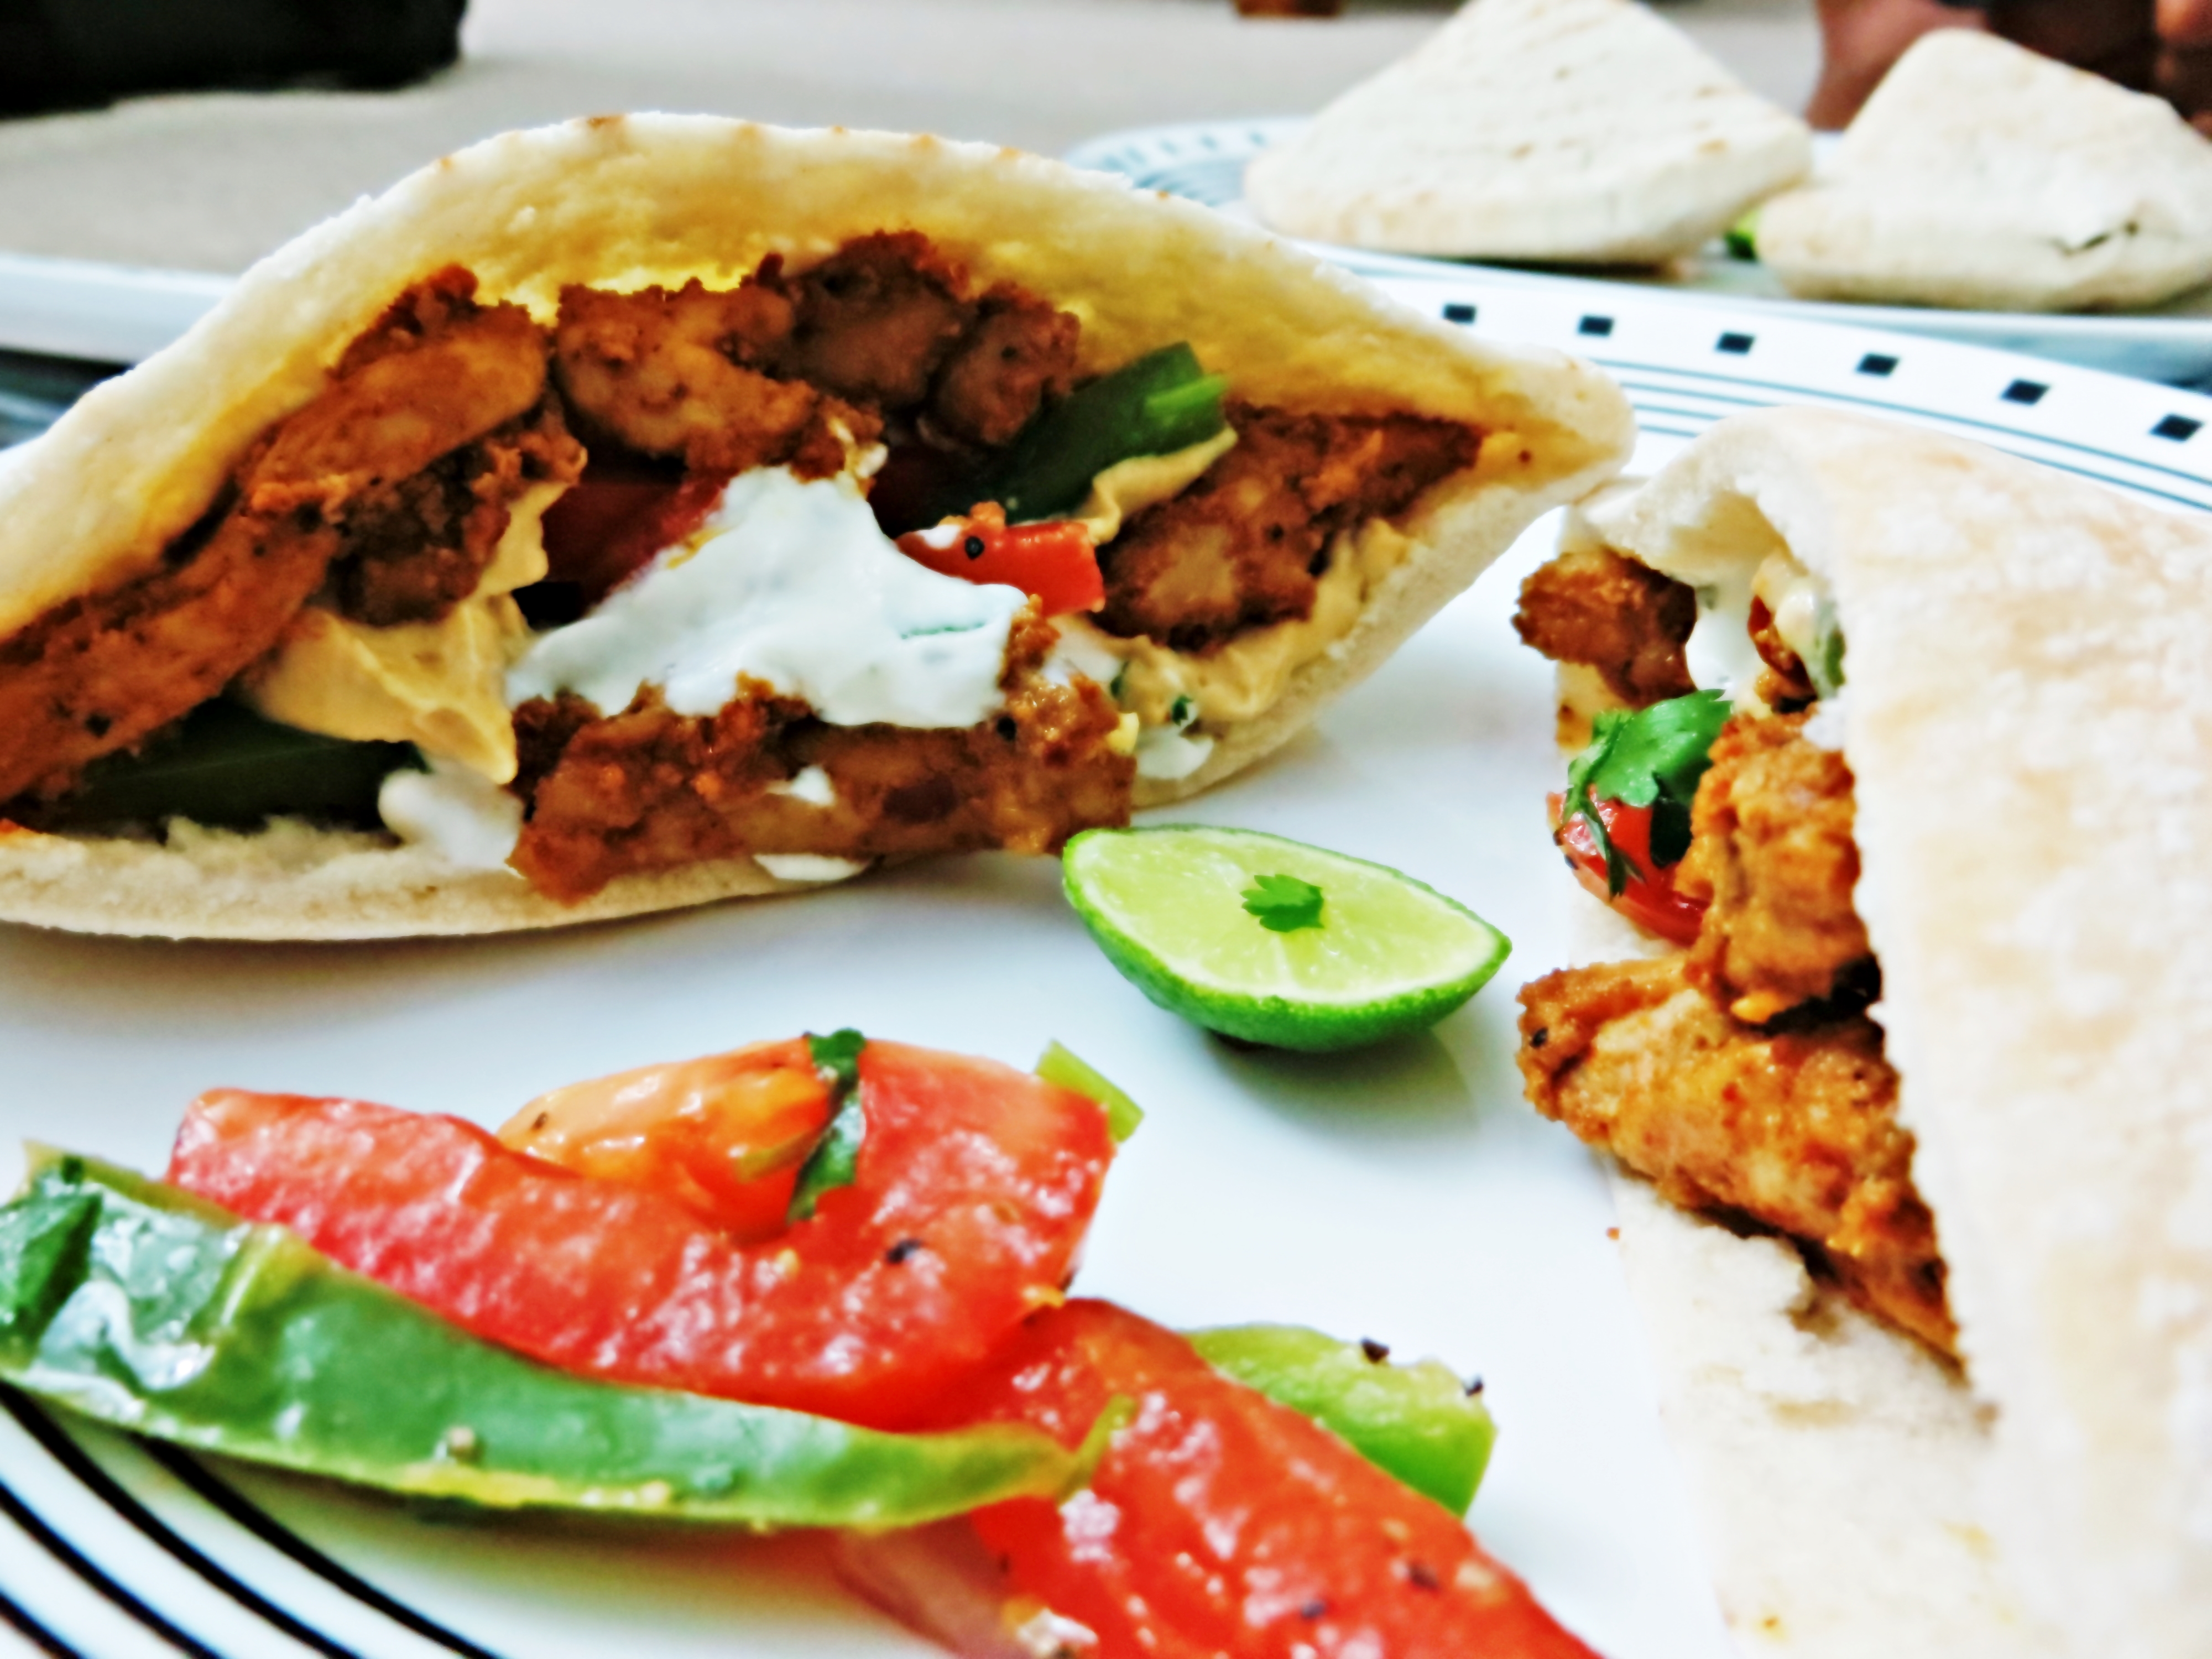
I wonder how simple things in life can bring so much peace to your inner self. It can be anything like your one cup of coffee or tea in the morning or one sweet gesture from a stranger. These simple little things makes your life so easy and uncomplicated. For me its my son’s sweet smile and his unconditional love. He makes my imperfect life so perfect. Same thing applies for food. You may drool over all the fancy items you see in the restaurant but when it comes to homemade food nothing can beat it. Not only its simple, healthy and nutritious but also its made with so much love. Today I am presenting you a dish which is very simple to make at home and is one of the world famous Indian dish which can be found in all or most of the Indian restaurants (Except vegetarian ones) – Tandoori Chicken or Tandoori Murgh. The dish tastes best when marinated overnight which enhances the flavor. In restaurants, its made in a Tandoor (bell shaped clay oven also used to make Naan and Roti) which is the traditional way of cooking this dish. This dish is deliciously spiced with super crisp skin to die for. Generally, in restaurants it gets its bright red color with artificial color which is not only unhealthy but also unnecessary so I skip it. The red chilli paste instead provides excellent color but it also increases spice level. The Kashmiri red chili powder or Paprika will keep the spice level low but also add rich color to the dish.
Ingredients :-

Chicken drumsticks  8 pieces
Red Chilli Paste 4 teaspoons
Ginger and garlic paste 3 tablespoons
Salt to taste
Chat Masala 1 and 1/2 teaspoon
Tandoori Masala 1 and 1/2 teaspoon
Oil 1 tablespoon
Hung Curd 3 tablespoons
Lemon juice 1 tablespoon

DSC_1116

Method:-

  • Preheat the oven at 400 degree Fahrenheit.
  • Mix everything except Drumsticks under ingredient list in a big bowl.
  • Wash the drumsticks properly and pat dry with kitchen towel or tissue paper.
  • Using a sharp knife make deep slashes in the drumsticks. This makes ensure that the marinade penetrate deep in the meat.
  • Toss the drumsticks with marinade well, cover and refrigerate it minimum for 4-5 hour or overnight. 
  • Line a baking tray with aluminum foil and place an oven proof rack over top.
  • Arrange the marinated drumsticks on the rack keeping some distance in between.
  • Cook for 30-40 minutes until the chicken is well cooked.
  • Turn the oven switch to broiler and flash each side of chicken under the broiler for about 5 minutes until the skin is super crisp and bit charred.
  • Serve it hot as a starter or a side dish.

DSC_1113.JPG

Notes :-

  • As usual I like my Chicken dishes bit spicy but here you can adjust the chili paste according to your taste.
  • If you don’t have chilli paste you can use Kashmiri or paprika powder for color.

DSC_0997
Being mother is hard, fun, challenging and life changing. Each day you learn so many things from your child, from the circumstances, etc., you hardly get time to enjoy yourself by having your own personal time. When things are tough, you have to find alternate ways of keeping yourself busy and overcome unwanted / unpleasant situations. Luckily, there is food to the rescue. I eat or make food when I feel sad, overwhelmed, exhausted, happy, etc. Creating something new and healthy gives inner satisfaction to my soul. Sometimes they do not turn out as I wanted (and I get mad) but slowly I start analyzing positives and learn from mistakes.

Coming back to this post, it’s one of the most delicious dishes and can be made in a jiffy. This recipe makes good use of the leftover rice (brown or white) which otherwise might be sitting idle in refrigerator. I always like fresh ingredients hence using fresh corn in this recipe will make it taste even better. The patties can form base for many dishes like burgers, wraps, sandwiches, subs etc. I have used them in the form of a wrap and it becomes the wholesome dinner/lunch OR can be enjoyed as snacks with a hot cup of tea.  You can even add grilled shredded chicken or scrambled egg to make it more hearty and meaty. The combination is endless so get your creative mind rolling and try it on. It also works well with picky toddlers/kids who likes specific type of food.

Ingredients :-

For Corn Rice Patties/Cakes:-

Fresh boiled corn/Canned corn kernels 1 and 1/2 cup 
Oil 4 tablespoons
Onions, chopped 2 medium
Cilantro, finely chopped 2-3 tablespoon
White/Brown rice, boiled 1 and 1/2 cup
Potatoes, peeled and boiled 2 medium
Salt to taste
Green chillies, finely chopped 2
Crushed red chillies 1/2 teaspoon
Fresh bread crumbs 1 cup

For Wrap/Roti

Whole wheat flour 1 cup 
Oil 1 tablespoon
Salt a pinch

DSC_1004
Method :-

  • If you are using fresh corns take out the kernel and boil it until soft. Discard the extra water.
  • Heat 2 tablespoon oil in a nonstick pan. Add onions and saute it until onion turns light brown.
  • Add the corn kernels and saute for 2-3 minutes.
  • Take out the onion corn mixture in a bowl.
  • Add rice, mashed potatoes,salt, green chilies, crushed red chilies, cilantro leaves and mix well mashing the contents slightly.
  • Add the fresh breadcrumbs and mix well. Keep the mixture aside for 10-15 minutes.
  • Heat 2 tablespoon oil in another non stick pan. Divide the mixture into equal parts and make oval or round shape patties/cakes out of it.
  • Place the patties on the second pan and cook each side till both sides are equally golden.
  • Serve hot with any sauce, salsa or tomato ketchup. 
  • For oven spread the patties in a baking sheet and spray a little oil over them.Then cook them in a preheated oven of 350 degrees Celsius for 15 minutes.
  • If you want charred effect broil it both sides for 2 minutes each.

For wraps :-

  • Combine all the ingredients in a bowl and knead into a soft dough using enough water. Keep aside.
  • Divide the dough into four equal portions and roll out each portion into a round circle approx of 8 inch diameter using a little flour.
  • Heat a non-stick griddle and lightly cook the rotis/wraps on both the sides. Keep aside.

Assembling :-

  • Cut julienne of a medium onion.
  • Just before serving warm a roti on griddle.
  • Place the roti/wrap on a clean, dry surface and spread one teaspoon of green chutney, ketchup or any of your favorite sauce or salsa on the wrap/roti.
  •  Arrange 2 patties/cakes in a row in the center of the roti/wrap
  • Spread some onion julienne over the patties.
  • Roll the wrap tightly and serve it hot.

DSC_0984

Notes :-

  • Instead of rotis you can try this rolls with soft tacos.
  • You can even deep fry the patties/cakes.
  • Amount of chillies can be increased or decreased according to your taste. 
  • If you like the taste of mint leaves you can add some of it in patties.
  • Here I have used yogurt sauce for the rolls. If you want you can follow the recipe for yogurt sauce here Falafel – The Healthy Way

DSC_0554

Ah! It’s been such a long time, since my last post was published 7 months ago. I have been consistently inconsistent in publishing recipes in 2015 (its typical me). We traveled a lot in 2015 and it was very difficult to keep up with posting recipes(Again one lame excuse). Last year I striked-off one item from my bucket list of visiting Switzerland. It was my dream since I was 10. The mesmerizing beauty and yummy food (especially cheese and milk) made this trip very awesome. Now coming back to my post, this is a very easy-peasy recipe. Once you make the pesto its very easy to assemble the sandwich.  I personally like basic pesto a lot since you can make endless dishes out of it. I hope and wish to write more dishes this year :). For basil pesto you can find here https://love2experiment.wordpress.com/2015/05/28/baked-pesto-pasta-muffins/

Ingredients :-
For Sandwich :-

Basil Pesto
1/2 cup
Bread Slices
8
Tomato, cut in roundels
1 small
Onion, cut in rings
1 small
Zucchini, cut in roundels
1 small
Eggplant, cut in roundels
1 small
Mozzarella Cheese, Shredded
1/4 cup
Salt
to taste
Black Pepper Powder
to taste
Garlic Powder
1/4 teaspoon
Olive Oil
as required

For Roasted Baby Potatoes :-

Baby Potatoes 8-10
Cherry Tomatoes
4-5
Crushed black Peppercorns
1 teaspoon
Sea Salt
to taste
Olive oil
2 tablespoon
Basil Pesto
1/2 cup

DSC_0540

Method :-

For Sandwich :-

    • Marinate the zucchini and eggplant with salt, pepper, 1 teaspoon of olive oil and garlic powder.
    • Heat the grill pan and spread one teaspoon of oil uniformly.
    • Grill the zucchini and eggplant on both sides till they are 3/4th done.
    • Spread the pesto on each bread slices uniformly
    • Now arrange the grilled eggplant, zucchini, onion rings and tomato roundels uniformly on 4 bread slices.
    • Spread mozzarella cheese equally on the four bread slices
    • Cover it with rest of the four slices.
    • Spray oil on panini press/Sandwich maker and grill the sandwiched till well toasted and golden in color.
    • Enjoy it hot with ketchup.

For Roasted Baby Potatoes :-

    • Preheat oven at 350 degree Fahrenheit.
    • Marinate potatoes with sea salt, 1 teaspoon of olive oil, crushed peppercorns in a cake pan and mix well
    • Put the pan in preheated oven and bake for 40-45 minutes.
    • Remove the cake pan from oven.
    • Add the basil pesto and cherry tomatoes to it and bake it again for 5 minutes
    • Transfer the mixture into serving platter and serve immediately

DSC_0549

Note :-

  • You can add red chili flakes for roasted potatoes if you want to make it spicy.
  • You can use any grilled vegetables as you like.
  • You can even parboil the potatoes and then give it a quick stir fry before adding pesto.
  • You can use potato instead of baby potatoes. Take four of them and cut it into wedges.
  • You can use any pesto other than basil. It can be homemade or ready made. But I guarantee once you try it on your own you will never turn towards the ready made ones.


DSC_0675

I can’t believe it’s August already and my Lo will soon turn 1.5 years and keeping me super duper busy. All his toddler tantrums is so overwhelming and exhausting. I was thinking of posting this recipe a month back but just could not find time to write and post the recipe. I always keep looking for vegetarian recipes that are easy to make and yummy to give any meat lovers a delight. Kebabs is one of my favorite dish, especially Chicken Kebabs. My hubby is a vegetarian so keep exploring options and try to convert non vegetarian dish into a vegetarian dish by adding some twists. This ensures that even vegetarian people can equally enjoy food as compared to non vegetarian people especially Kebabs. The type of Kebab which I am writing down make my mouth water whenever I see, eat or even dream about it. The ‘melt-in-mouth’ texture due to Paneer (cottage cheese) and regular cheese and loads of nutrition from vegetables makes it extraordinary, yummy and in way healthy. You can either pan fry or deep fry this type of Kebab. You can make the mixture one or two days ahead of party / get together and fry it on the “D day”. Its definitely a crowd winner which was evident when I won 1st prize in cooking competition at hubby’s office. This recipe is adapted from my favorite chefs website Mr Sanjeev Kapoor.
Ingredients :-

Paneer , Indian Cottage Cheese
1/2 cup
Potato, Boiled and Mashed
1 large
Carrot, Boiled and mashed
1/4 cup
Spinach, Blanched and chopped
1/4 cup
Green Peas, Boiled and mashed
1/4 cup
Cauliflower, Steamed and mashed 1/4 cup
Mozzarella Cheese, Cubed 1/4 cup
Whole wheat bread crumbs 1/2 cup
Chat Masala Powder
1 1/2 tablespoon
Garam Masala Powder
1 teaspoon
Red Chilli Powder
1/2 teaspoon
Salt
to taste
Oil
for deep/shallow frying

Method :-

  • Mix all ingredients together except mozzarella cheese, oil and bread crumbs to form a firm dough.
  • If the dough is not firm add some bread crumbs into it.
  • Keep it in refrigerator for at least one hr.
  • Divide the dough in 12-14 equal portion.
  • Make a round ball out of each equal portion and stuff one cube of mozzarella cheese into it.
  • Flatten the dough into Pattie and roll it into wheat crumbs generously.
  • Heat a non stick pan and put oil in it.
  • Shallow fry the patties into the pan until both the sides get golden brown in color.
  • You can even deep fry the patties but before that test one of the patties. If it breaks add some more breadcrumbs into the dough.

DSC_0681

Notes :-

  • You can increase/decrease the heat of chilli powder and garam masala powder depending on your taste buds.
  • You can even use toasted oats in place of whole wheat breadcrumbs.
  • Keep in mind that vegetables should not be over boiled or over steamed. Too much moisture will leads in addition of too much bread crumbs and you will loose the real taste of kebabs.
  • You can also use Ricotta Cheese instead of Paneer.
  • You can even used crushed cornflakes in place of breadcrumbs to roll the patties. It taste yummier because of crunchy cornflakes.

IMG_0381

What came first – Chicken or Egg? A million dollar question? But who cares as long as we are getting the delicious recipes out of it. The middle east cuisine is one of my favorite and I love it very much. The love for Shawarma, Hummus, Falafel, Tahini, Pita, Baklava gets me drooling. The word Shawarma comes from the Turkish word Cevirme which means to rotate. The process of cooking Shawarma involves shaving off the meat stack with a large knife (an electric knife or a small circular saw), dropping to a circular tray below to be retrieved. The recipe I have tried is an easy version of Shawarma style of cooking by grilling the chicken. Its easy and takes ~ 30 minutes of total cooking time (10 minutes for assembling ingredients and marinating & 20 minutes for cooking). The marination time of course depends on you. The more time you leave chicken for marination, the tastier and juicier the dish will be. The cooking can be done either by grilling or broiling in the oven and hence it can feed lot of people at the same time during parties. The chicken can be served with Pita bread as a wrap or sandwich or can be served with flavored rice and salad. Most of the spice used here can be easily found in your pantry especially an Indian pantry like cumin seeds, coriander, paprika or red chilli powder. So what are you waiting for? Gather all your ingredients and try this for a hearty dinner. I am sure you will make again and again.

Ingredients :-

For Marinade:-

Greek Yogurt/Hung Curd 1/2 cup
Cumin Powder 1 teaspoon
Coriander Powder 1 teaspoon
All spice/ Chicken Masala 1 tablespoon
Garlic paste 1  tablespoon
Paprika 1 teaspoon
Red Chilli Powder to taste
Salt to taste
Olive oil 1 tablespoon
Lemon Juice 1 tablespoon

For Shawarma Wrap:-

Chicken Thighs
1 pound
Green Bell Pepper, Sliced
1/4 cup
Cucumber, Sliced
1/4 cup
Onion, Sliced 1/4 cup
Tomatoes, Sliced
1/4 cup
 Yogurt Sauce, Recipe below
2-3 tablespoon for each Pita
Hummus 2-3 tablespoon
Pita Bread
2-3
Salt to taste

For Yogurt Sauce:-

Greek Yogurt
1/2 cup
Lemon Juice
1 tablespoon
Olive Oil 1 tablespoon
Garlic, Finely Chopped
1 clove
Parsley, Finely Chopped
1 tablespoon
Cilantro/Coriander Leaves, Finely Chopped 1 tablespoon
Black Pepper Powder
1/4 teaspoon
Salt to taste

Method :-

  • Combine all the ingredients mentioned under Marinade section in a big bowl.
  • Wash and pat dry the chicken with tissue paper.
  • Cut long stripes out of it.
  • Now add the chicken stripes in the marinade bowl and give it a good mix.
  • Refrigerate the chicken at least for 1 hr or for whole night.
  • Now grill the chicken on a grill pan or on griller if you have any. You can also bake it in oven for 15-20 minutes at 350 degree Fahrenheit and then broil it on both sides for 3-5 minutes depending on your oven heat.
  • Meanwhile combine all the ingredients under Yogurt sauce and give it a good mix. Refrigerate it until use.
  • Now warm the pita bread on pan for 2-3 minutes.
  • Cut the pita bread into half.Now you can see pockets of it
  • Spread the yogurt sauce in the pockets of pita bread.
  • Arrange the sliced vegetables into it and then add chicken strips.
  • Enjoy it with side of hummus.

IMG_0380

Notes :-

  • You can use chicken breast instead of thighs.
  • It can also be made beforehand for a large number of people. You just have to warm it in oven before serving.
  • You don’t need any oil for grilling as marinade already had oil in it and chicken thighs has its own natural fat.
  • If you don’t like the raw taste of onion and bell pepper you can saute or grill it.

cornpaneerfritters

Diwali is here and every household in India is buzzed with activities like cleaning, making sweets (Mithais) and snacks (Namkeen). For me Diwali means thrill, joy, happiness, fun, bursting firecrackers, etc. As kids, we use to fight for ‘who gets the most firecrackers to burst’. Diwali usually lasts 15 days before and after actual day which means 1 month of fun and happiness. During Diwali, we use to help mom with cleaning the house & making sweets, purchase new clothes, etc. Oh those were the best days of my life. Coming back from memories, let me share Diwali delight with this healthy & yummy recipe. The Tikki is one of my favorite snacks which I can relish anytime. It can be eaten in various forms like chaat, or just with chutney. This will be a very easy and yummy dish to serve to guests this Diwali and will surely give new dimension to your party.

Ingredients :-

Crumbled Paneer/Cottage Cheese 1 cup
Corn kernels 1/2 cup
Potato, Boiled and mashed 1/2 cup
Onion, Finely chopped 1/4 cup
Chilli powder 1 teaspoon or as to taste
Garam Masala Powder
1 teaspoon
Amchur/Dried Mango Powder
1 teaspoon
Fresh Ginger, Grated
1 inch
Green Chillies, Finely chopped
4-5
Black Pepper Powder
1/4 teaspoon
Cilantro, chopped
1 teaspoon
Salt
to taste
Cornflour
1 tablespoon
Bread Crumbs
1/4 cup
Oil
For shallow frying

Method :-

  • Boil the corn kernels, pat dry and crush it. Keep aside to let it cool.
  • Heat two teaspoon of oil in a pan and add green chilies and onion to it. Sauté it till the onion turns translucent and pink.
  • Let it cool and then mix onion mixture,  paneer (cottage cheese), potatoes, boiled corn kernels, dry masalas(spices), ginger, salt, cilantro and corn flour. Mix it well.
  • Divide the mixture into small equal tennis ball sized portions, flatten it and lightly press in the shape of tikkis/fritters.
  • Roll the tikkis/fritters with bread crumbs and shallow fry in oil till they turn golden brown in color from all the sides.
  • Serve hot with green chutney or ketchup

Note :-

  • You can increase/decrease the quantity of chillies as you want.
  • You can even stuff the tikkis/fritters with mozzarella cube cheese.

hariyalimachli

Fish to taste right must swim three times – in water, in butter and in wine. Fish is usually low in fat and high in omega-3 fatty acids. Omega-3 improves mental functions and helps in maintaining a healthy heart by lowering blood pressure. Whenever I cook fish in my kitchen I start swimming in my memories and go back to my childhood days when my Dad insisted us to eat fish due to its nutritional value. We as kids use to hate the smell, tiny & fine bones sticking in the mouth / throat. Usually, in India we use to get fresh water fish with all bones intact. But now I love fish more than anything else and I can take all the pains to cook and eat it. I like my Fish cooked with garlic. In this recipe I have marinated fish with grounded green paste and then pan fried till crisp. This is a very refined, low in calories and extremely palatable dish.

Ingredients

Cilantro
1 bunch
Mint
1 bunch
Green Chillies
6
Yogurt
1 cup/250gms
Juice of Lemon
1
Olive Oil
1/4 cup
Cumin Seeds
3 teaspoon
Garlic Paste
1 tablespoon
Roasted Gram Flour/Besan
2 teaspoon
Black Pepper Powder
1/2 teaspoon
Ginger Paste
1 tablespoon
Salmon Fish
4 rectangular pieces

Method :-

  • Roughly chop the Cilantro, Mint, Green chillies and put into a mixer jar.
  • Add lemon juice, sufficient water, ginger paste, garlic paste and roasted gram flour and grind to a coarse paste.
  • Cut fish into rectangular pieces and place in a bowl. Add green paste, crushed black peppercorns, salt and mix well.
  • Set aside to marinate for ½ hour.
  • Heat oil in a non stick pan.
  • When oil is hot add fish one by one, cover and cook for 2 minutes.
  • Flip and cook from the other side for 2 minutes. Transfer onto a serving plate and serve hot.

haryalimachli

Note :-

  • You can use any fish of your choice instead of Salmon.
  • You can also cover the fish with rice flour and semolina and then pan fry it.
  • You can even grill the fish. In that case don’t use roasted gram flour.
  • You can increase or decrease the quantity of chillies as per your need.

Khandavi

Khandvi is a very popular Gujarati (Gujarat is a state located in western part of India) snack loved by everyone especially kids. Its made up of gram/chickpeas flour flavored with tempering of pungent mustard, spicy green chillies, grated sweet coconut and aromatic cilantro leaves. My hubby is a Gujarati and he loves it so did I when I tasted it very first time. But I was skeptical to make it at home due to difficulty involved in making those beautiful spirals which gives a unique look to this dish. One of our common friend (also a Gujarati) inspired me in making this dish using microwave. We both tried our hands on but it didn’t turn out too well. We tried frozen Khandvi but it wasn’t that great. After few months, I made up my mind to make it again using traditional method and it came out almost perfect. I was on cloud nine when I was able to roll it without any fuss. Try this fluffy, soft and delicious snack at home. Its worth all the effort you will put in. Enjoy this with morning/evening tea. I hope you’ll like it.

Ingredients :-

Besan/Gram flour/Chickpea flour
1 cup
Sour Yogurt
1 cup
Water
1 1/2 cups
Lemon Juice
2-3 drops
Green chilli paste
1 teaspoon
Ginger paste
1 teaspoon
Asafoetida
1/4 teaspoon
Turmeric Powder
1/4 teaspoon
Salt
to taste

For Seasoning :-

Mustard Seeds
1/2 teaspoon
Cumin Seeds
1/2 teaspoon
Sesame Seeds
1 teaspoon
Curry Leaves
5-6
Green Chillies, Slit lengthwise
2-3
Grated Coconut
2 tablespoons
Cilantro, Finely chopped
2 tablespoons
Oil
1 tablespoon

Method :-

  • Whisk the yogurt, water and besan together so that no lumps remain.
  • Add lemon juice, ginger paste, green chilli paste, turmeric powder, asafoetida and salt to it and mix it again.
  • Take a deep non-stick pan and pour the mixture into it.
  • Cook on slow flame while stirring continuously till it becomes thick. This will take approximately 10-15 minutes.
  • After about  15 minutes of stirring, taste the gram flour mixture to see if its still uncooked. If you are unable to determine, then stir continuously for another 5 minutes.
  • Spread a long aluminum foil of about 18-24 inches and grease it with oil. You can even grease a thali(plate) of approx 10 inch. Pour a spoonful of the batter on a greased thali/aluminum foil and spread it as thin as possible. Wait for a few seconds and try to roll up. If it doesn’t, then cook for a few more minutes, and check once more till done.
  • Keep the mixture covered, so it remains hot while you proceed to the steps below.
  • Spread the hot mixture on the thali/aluminum foil as thinly as possible, with a flat spatula. When you have finished spreading the batter, let it cool till it settle down. This will take approx 8-10 minutes.
  • When cool, cut the khandvi on thali/aluminum foil lengthwise (approx. 1½” in width) into equal portions.
  • Roll each cut portions gently taking care that it does not torn out. Place the cut rolls on a serving dish
  • For tempering, just before serving, heat oil in a pan. Add mustard seeds, cumin seeds, sesame seeds, allow them to crackle. The add the curry leaves and green chillies on medium flame for few seconds.
  • Pour the tempering over the khandvi’s (gram flour rolls). Serve immediately garnished with cilantro and coconut. Serve it hot with green chutney.

khandavi1
Note :-

  • This can be made one day ahead and kept in the refrigerator and warmed up in the microwave before serving.
  • No one can deny that this item is difficult and tedious to make. Be patient, and remember to cook the paste slowly and completely till thick.
  • Take care to roll the khandvi lightly; and temper well.

sesame bread 1

Sometimes, I feel lazy to cook a wholesome meal but still want something quick, easy & light to eat. In such situations, sandwiches rescues me as it fills up the tummy and is very easy to make. Sandwiches are scrumptious, healthy, requires less cooking effort, and wholesome food. There are various types of sandwiches made around the world. In this recipe, I have tried my hand on a different type of sandwich called as ‘open sandwich’.  Technically, sandwiches are closed or clubbed between two breads but lets try something else. Its an excellent recipe for breakfast or snacks which will probably be loved by different age groups, especially kids. This crispy sandwich can be relished hot with chutney or sauce. I have tried my hand on a healthy version of sandwich by using whole wheat bread and vegetables. I hope you’ll like it.

Ingredients :-

Whole Wheat Bread Slices
4
Potato, boiled and mashed
1 big
Mushroom, finely chopped
1/2 cup
Garlic paste
1 teaspoon
Ginger Paste
1 teaspoon
Salt
to taste
Cilantro
1 tablespoon
Carrot, finely chopped
1/2 cup
Green bell pepper, finely chopped
1/4 cup
Tomato, finely chopped
1/2 cup
Onion, finely chopped
1 medium
Sesame seeds
1 tablespoon
Black Pepper Powder
1/2 teaspoon
Lemon Juice
1 teaspoon
Dried Parsley Leaves
1 teaspoon
Red Chilli Powder
1/2 teaspoon
Olive Oil
1 teaspoon + 1 tablespoon

Method :-

  • Heat the oil in a pan and add onion to it. Saute the onion on medium flame till they turn translucent.
  • Add ginger, garlic paste and saute it for 2-3 minutes till the raw smell disappears.
  • Add the chopped mushroom, carrot, green bell peppers and saute it for 3-4 minutes till all vegetables are 3/4th done.
  • Add chopped tomatoes, parsley leaves, red chilli powder, black pepper powder,lemon juice,salt and mix it well.
  • Turn off the heat and let it cool. Divide this mixture into four equal portion.
  • Add salt, cilantro and black pepper powder into mashed potatoes and mix it well.
  • Apply butter to bread slices. Put 1 portion of the mixture into bread and spread it evenly.
  • On top of this mixture spread the mashed potatoes evenly and sprinkle generous amount of sesame seeds on top of it.
  • Repeat this for all bread slices.
  • Place each open sandwich slice on a non-stick tava (griddle) with the topping facing downwards and cook, using ¼ tsp of oil, till the topping turns golden brown in color.
  • Turn over and cook till the other side turns golden brown in color.
  • Cut each bread sandwich into 2 equal portions diagonally and serve immediately with ketchup or chutney. Enjoy it hot!

sesame breadNote :-

  • You can also bake these sandwiches in a preheated oven for 4-5 minutes.
  • If you want you can add cheese on top of it. That will taste more delicious.
  • I have used whole wheat but you can try this with any type of bread.

tandoori aloo

Potatoes always finds its place in most parties. You can serve it as an appetizer, side dish, curry/main dish, sweet dish, etc. Yeah you heard it right! You can even make sweet dish out of Potatoes. I have had Gulab Jamuns (deep fried balls in sugar syrup), Jalebis and sweet pudding made of potatoes. The potatoes are great for people fasting on special occasions. For me, the baby potatoes, tastes best when roasted in any flavor/spices. Tandoori Chicken is one of the favorite Indian appetizer but you can make the same juicy and delicious dish with potatoes, paneer (cottage cheese) or cauliflower. I tried the vegetarian version with baby Potatoes to make Tandoori Aloo and its a great snack for vegetarians. I like the potato skin but I peeled it off when trying this dish. Potato skin is healthy and gives a distinct flavor so you might want to try with the skin on. The broiling technique gives the charred and slightly burnt taste which closely matches with the ‘tandoor’ flavor. When broiling, for best results, keep checking potatoes frequently otherwise it will burn more than you want. So enjoy this easy and quick appetizer!

Ingredients :-

Baby Potatoes
20-22
Roasted Chana (Bengal Gram) Powder
2 tablespoon
Fresh Hung Curd
1 1/4 cup
Fresh Cream
1 tablespoon
Dried Fenugreek Leaves/Kasoori Methi
1/4 tablespoon
Oil
1 tablespoon
Salt
to taste
Kashmiri Red Chillies, dry
4 whole
Garlic
3-4 cloves
Ginger
1/2 inch
Coriander-Cumin Powder
2 teaspoon
Turmeric Powder
1/4 teaspoon
Garam Masala Powder
1/2 teaspoon
Cilantro/Coriander Leaves
1 tablespoon
Lemon Juice
1 teaspoon
Chaat Masala
1/2 teaspoon

Method :-

  • Ground Red chillies, garlic, ginger and coriander-cumin powder into paste with help of little water. This is your grounded masala/spice/paste.
  • Wash the potatoes thoroughly, peel the skin off, pierce them with a fork and cook them till they get par boiled or half cooked.
  • Mix grounded paste, roasted chana powder, kasoori methi, turmeric powder, garam masala powder, salt with hung curd and whisk it until you get uniform mixture.
  • Add the parboiled potatoes to the curf mixture and let it marinate for 1 hour.
  • Heat a pan and add oil to it. When oil becomes hot add the potato-curd mixture to it and let it cook for about 15 minutes in low heat till all the liquids of masala dries up. Add  cream to it and give it a mix. Sprinkle chopped cilantro on top of it . Serve hot with some drizzled lemon juice and chat masala on top of it.
  • You can serve this tandoori aloos as appetizers with  some thinly sliced onion, tomatoes, green bell peppers and cilantro chutney. You can also serve it as filling for wraps.

tandoori aloo1

Note :-

  • You can also bake potatoes in oven. Grease your baking tray or line in the tray with aluminum foil and bake them for 5 to 7 minutes in a preheated oven at 180 degrees C/350 degrees F. Broiling will give the best taste & effect.
  • For making hung curd, tie fresh curd tightly in muslin or cheese cloth (it will look like a ball) and hang it till the water drains out completely. Usually, I hang the cloth around water faucet over the sink for about an hour for best results.
  • If you want to save time you can use store bought tandoori masala available in any Indian/Asian market instead of making grounded masala.
  • If you have time, marinate potatoes overnight for best results.
  • Remember, potatoes are to be parboiled otherwise they will break up easily while marinating.
  • Don’t forget to prick the potatoes before marinating as it will help in seeping the masala/spice inside potatoes.