Archive for April, 2016

DSC_0098
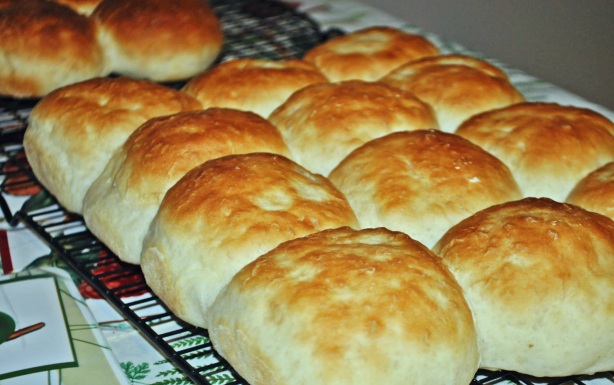
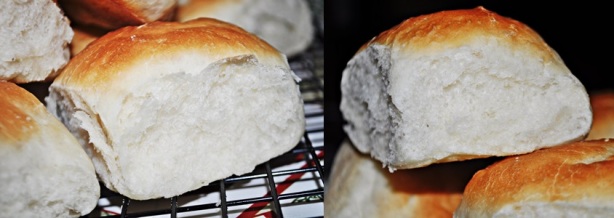
Continuing my commitment to post recipes regularly, I started to look at the pictures I took in the past to inspire me for the next post. It was then I stumbled across above picture and started writing this post. I love these buns aka paav aka dinner rolls especially the ones made in Mumbai. They are so fresh, soft, buttery and delicious. The paav forms a base of many popular street foods of Mumbai like Paav Bhaji, Vada Paav, Dabeli, Misal Paav, Masala Paav, etc. Being away from Mumbai since a long time and unavailability of good paav in our town, I decided to try making them. I was tired of using burger buns brought from the store since they do not taste that great with our street food. What’s so special about the laadi paav? It’s the pillow-like texture which you can eat all the time as it is. They are light yellowish brown in color. The overall effort put in to making laadi paav is little bit overwhelming and tedious but results are awesome. Now, I do not fear to make them at home and have stopped buying buns from the store.
Ingredients :-

All Purpose flour 3 cups
 Active Dry Yeast 1 packet
Salt 1 teaspoon
Sugar 2 tablespoon
Butter, room temperature 3 tablespoon 
Water, lukewarm 1 and 1/4 cup


DSC_0116-horz

Method :-

  • Mix yeast and lukewarm water together along with sugar. Give it a stir and keep it aside until frothy.
  • Add salt and butter to the yeast and stir well.
  • Slowly add the flour one cup at a time to this mixture until well incorporated. 
  • The mixture will be slightly sticky but don’t worry. The stickiness will be removed while kneading.
  • Lightly dust your clean kitchen counter. Start kneading the sticky dough into the surface for about 10-15 minutes. This process needs lots of your muscle power as you need to knead the dough very well as kneading will help the gluten to develop in dough. It is ok to use some dry flour if needed while kneading ( approximately 2 tablespoon ).
  • Keep the dough into a large lightly greased bowl and cover it with a plastic wrap or damp cloth.
  • Keep it aside for one hour or until the dough is doubled.
  • After an hour knead the dough which would have doubled by size for 5-8 minutes. 
  • Divide the dough into 12 equal pieces and roll it into round shapes. Place the balls on greased baking tray leaving some space in between like about 1 inch.
  • Again cover the dough balls and let it double again. It will take about 45-60 minutes. The balls will get stick to each other.
  • Bake them in a preheated oven at 350 F for 15-20 minutes or until lightly browned.
  • Cool them for half an hour before eating as they will feel hard when hot but will turn super soft once cold.
  • Enjoy it as Daabeli, with Pav Bhaji or just simple Maska Pav ( All Mumbai streetside dishes)

DSC_0107

Notes :-

  • You can make this buns/pavs with half all purpose flour and half whole wheat flour or even with whole wheat flour. The whole wheat flour will be bit dense.
  • Remember to use good quality yeast. Also yeast reacts best with sugar along with lukewarm water. So water should not be cold or very hot. Lukewarm water has the best temperature for reaction of yeast.
  • Ladi Pav/Bun will stay fresh when stored in air tight container but its most delicious when eaten fresh. 

IMG_0248

Over the past couple years, I have started to bake more often primarily as the store brought cakes are little too sweet for my taste buds. I do like homemade cakes, though. I initially started baking using eggs but its a lot of work for me. Hence, I started to learn baking egg-less cakes. It does not require any special equipment, but there are certain ingredients which helps in making egg-less cakes awesome. The secret ingredient being Vinegar and baking soda, which makes the cake soft and spongy. When Vinegar reacts with baking soda it create air bubbles which result in light aerated cake. Although, I have not tried it but I have heard that you can make egg-less cake with Coca Cola. I will definitely try that too and let you know the outcome. In this cupcake recipe, one of the best thing is the combination of chocolate and raspberry. The cupcake turned out to be light & fluffy and raspberry mousse elevates the taste and brings it to a new level by bringing mild tartness and sweetness together. This is one of the best cupcakes you can try in spring and summer. I personally like to add fruit in cakes or any dessert as it brings lots of colors and freshness to it. This cupcake is very close to my heart as it was made for my cupcake, my little munchkin 5th month birthday celebration. So enjoy this delicious treat on any occasion with your family and friends. 

Ingredients :-

For Chocolate Cup Cakes :-

All Purpose flour 1 and 1/2 cups
Sugar 1 cup
Salt  1/2 teaspoon
Baking Soda 1 teaspoon
Unsweetened Cocoa Powder 1/3 cup
Vanilla Extract 1 teaspoon
Water 1 cup
Vinegar 1 tablespoon
Oil  1/2 cup

For Raspberry Mousse Frosting :-

Fresh Raspberries 6 oz
Corn Starch Powder 1 tablespoon
Sugar 3/4 Cup
Agar Agar Powder 1 and 1/2 tablespoon
Water 1/3 cup
Cream Cheese 2 1/2 teaspoon
Heavy Whipping Cream 1/2 cup

IMG_0217
Method :-

For Chocolate Cup Cakes :-

  • Preheat the oven for 350 degree Fahrenheit or 180 degree Celsius.
  • Sift all purpose flour and cocoa powder together at least 2 times along in a bowl to remove lumps if any. Sifting also helps in lightening the cake.
  • In the same bowl add sugar, baking soda and salt.
  • Line the muffins tray with cupcakes liner.
  • In other bowl mix all the wet ingredients – water, oil, vanilla extract and vinegar.
  • Combine the wet mixture with dry ones mixing with spatula. Using wire whisk beat the mixture till well incorporated.
  • The batter will not be very thick. Do not over mix it. 
  • Bake it for 15-20 minutes or until toothpick inserted comes out clean.
  • Let them cool down completely before frosting otherwise frosting will melt. Its better to keep the cupcakes in freeze for one hour so that frosting can easily set into it. 

For Raspberry Mousse :-

  • For raspberry mousse first we need to start with raspberry jam.
  • In a pan soak the agar agar powder in hot water for about 10 minutes.
  • In a medium pan heat raspberry, sugar, salt and cornstarch on medium heat. Cook  until the mixture gets thickened, pressing the raspberries with spatula in between.
  • It will take about 6-8 minutes. Add the agar agar mixture and boil for one more minute.The mixture should be like a thick slurry in consistency.
  • Then press the raspberries through a strainer, discard the pulp and seeds and reserve the jam. Let it cool.
  • In a deep pan add the cream cheese and heavy whipping cream and with help of beater/hand mixer/stand mixer  beat it on high until soft peaks are formed.
  • Now fold the cooled down raspberry jam into whipped cream mixture gently and slowly. 
  • Refrigerate the mousse at least 6 hours to set it completely. So you can make the mousse one day ahead of the cupcakes to make it as frosting. You can even enjoy the mousse separately
  • Once the cupcakes are completely cool frost them with mousse as you want. You can pipe and decorate or just with help of knife spread it on top.
  • Garnish the cupcakes with fresh raspberries on the top and keep it in in freeze in air tight container.

page1


Note :-

  • While folding the cream and raspberry jam you have to do it very gently otherwise all the air created during whipping will be lost and mousse will not be light.
  • If you don’t get fresh raspberries you can make the mousse with frozen one too. You can also try the mousse with strawberry as strawberry and chocolate is a known world class combination.
  • This cupcake stays good for 4-5 days in refrigerator.
  • Make sure to use good quality cocoa powder for cupcakes as type of cocoa powder can affect the quality of final result.

DSC_0686

As I promised myself to post recipes of many of the dishes I made in 2015, I am trying to live up to it. It was tough to choose a specific one from the pool but I picked this one since I love this dish a lot. Its closer to my heart since it won as the ‘best dish’ in the food event at my husband’s office. This is one of the famous recipe of the chef Sanjeev Kapoor and it was showcased in Masterchef India too. Its a hard core ‘Punjabi recipe’ since its rich with cashew paste and cream, melt-in-mouth fried koftas and delicious gravy. Ooh la la, I am drooling. If you are a ‘calorie conscious’ person,  you will definitely need tweaks to make it low on calories. You will not be able to resist temptation of this alluring dish. I have tried both the versions and the no-fry-no-cream-no cashew version tastes as good as the original one. I have tried my best to replicate this dish but don’t know if it will match up to what was made by the great Sanjeev Kapoor, nevertheless, I am very satisfied with the end result. Please check the Notes section where I have mentioned some points for making this dish in alternate way keeping healthy options in mind. I hope you like it. Enjoy!!!

Ingredients :-

For Koftas :-

Fresh Spinach Leaves 5 bunch
Cottage Cheese/Paneer 1 cup
Salt  to taste
Green Cardamom Powder  1-2 pinch
Oil 2 tablespoon
Cumin seeds 1 teaspoon
Garlic, finely chopped 6-7 cloves
Green Chilli, finely chopped 5-6 
Gram flour(besan) 4 tablespoon
Turmeric powder 1/4 teaspoon
Corn flour/Corn starch 1/4 cup
Oil, for deep frying as required

For Makhani Gravy :-

Tomato, roughly chopped 10-15
Oil  2 tablespoon
Green Cardamom 10-12
Garlic Chopped 10-15 cloves
Salt to taste
Red chili powder 2 1/2 teaspoon
Butter 1/2 cup
Fenugreek leaves (methi), roasted and powdered 2 teaspoons
Honey 3 teaspoons
Fresh cream 1/4 cup
Boiled cashew paste 2 tablespoon

DSC_0691

Method :-

  • Blanch the spinach leaves in 4-5 cup of water for 2 minutes. Drain and put it in cold water or ice water.
  • Drain out all the water and then chop it finely. Keep it aside to cool in a bowl.
  • In other bowl mash the paneer along with salt and cardamom powder. Divide it into 8 -12 equal portions and roll into bowls.
  • Heat two tablespoon oil in a non stick pan and add cumin seed. After 2 minutes add garlic and green chilies and saute for 1 minute. Add the gram flour and saute for 1-2 minutes till gram flour gets little roasted and starts giving nutty flavor. Add the turmeric powder and stir.
  • Add the spinach and salt and saute. Keep stirring it continuously until the mixture is dry and starts leaving the sides of pan. Keep it aside to cool. Divide the spinach into as many equal portions as paneer balls.
  • Take water in a bowl and wet your palms. Take each spinach portion , flatten it onto your palm and place a paneer ball in the center. Gather the edges together and shape into a ball. Take cornstarch in a plate. Roll the stuffed spinach balls into it and shake the ball lightly to get rid of extra cornstarch. In same way make all the spinach balls.  Don’t forget to wet your palm with water in between as the spinach mixture can get sticky.
  • Heat oil for deep frying in pan. Gently slide the spinach balls when oil is hot and fry on low to medium heat until it turns golden brown. Drain it onto an absorbent paper and keep it aside.
  • Alternatively you can prepare a baking tray by spraying oil on it. Place the Spinach balls in it. Bake it for 15 minutes at 400 Fahrenheit and then broil it for 2-3 minutes on one side and again 2-3 minutes on other side.
  • For makhni gravy puree the tomatoes till smooth. Heat the oil in a deep non stick pan as the gravy tends to splutter a lot. Add the butter along with two tablespoon of oil as butter tends to burn.
  • When butter is hot add Green cardamoms and finely chopped garlic. Cook it for 1 minute and then add tomato puree. Let it cook until the rawness of tomatoes goes off and the puree leaves the oil. It will take about 20-25 minutes.
  • Add boiled cashew paste and cook it for more 5 minutes. Add salt, honey, fenugreek leaves, red chilli powder and cook it for 5 minutes. Add 1/4 cup water and let it simmer. Add the cream and cook for 2 minutes more. Your makhani gravy is ready.
  • Pour the makhani gravy into a serving bowl and place the koftas on the gravy and serve immediately. 
  • If you are not serving immediately keep the koftas and makhani gravy separately. While serving reheat both of them seperately and serve together as Koftas will turn soggy if kept for long in the gravy and reheated. Enjoy it with Naan or Tandoori Roti. 

DSC_0694

Note:-

  • You can even use garlic paste instead of chopped garlic in the makhani gravy.
  • For the healthier version you can skip the butter and cream part. Instead of cream add 1/2 cup of milk.
  • Instead of making your own tomato puree you can use 2 cup of ready made tomato puree. But mind you the homemade puree tastes much better and gives a character to the dish. I personally like the homemade one.
  • Original dish didn’t demand for cashew paste so you can skip it. If trying for healthier version add 2 tablespoon of boiled almond paste.