Archive for March, 2013

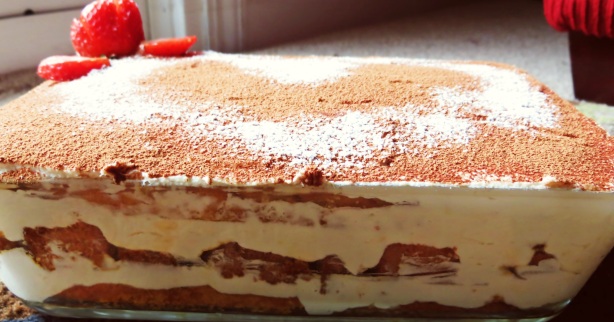
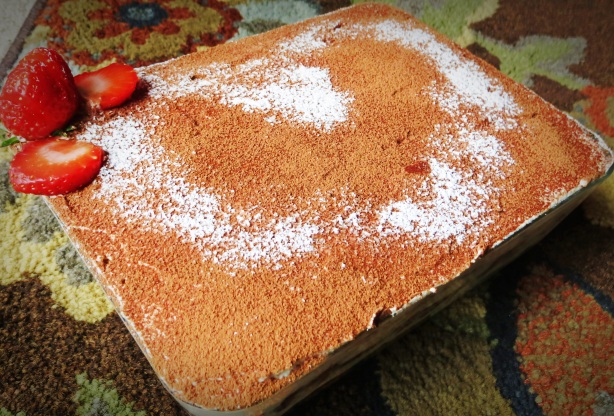
tiramisu

This time for my 2nd anniversary I decided to make the famous Tiramisu Cake from scratch and surprise my hubby. I tasted this heavenly delicacy in Olive garden for the first time and instantly fell in love with it. Tiramisu literally means ‘pick me up’ in Italian which probably refers to the jolt you get after eating espresso and alcohol laced ladyfingers. I always wanted to try my hand on making this delicious cake but was afraid of not doing real justice to it due to its complicated layering, texture and taste. Keeping aside all my fears I tried this with some googling and came to know that instead of sponge fingers I can use my own home made cake. After seeing the long list of preparation don’t be afraid to try it. Its really easy to make if you prepare yourself in advance. Here I have used my own home made Mascarpone (to keep in budget and to give it homely touch) cheese but you can skip this by buying it from any grocery store. Usually, the original recipe calls for eggs for filling and frosting but I skipped it as I was little skeptic to use raw eggs.

Ingredients :-

For the Vanilla Sponge Cake

Large eggs, separated
4
All purpose flour
1 cup plus more for pan
Corn Starch
1 cup
Baking Powder
2 teaspoon
Baking soda
1 teaspoon
Sugar
1 cup
Vanilla Extract
1 1/2 teaspoon
Salt
A pinch of
Butter, melted
2 tablespoon

For the espresso extract

Instant espresso powder
2 tablespoon
Boiling water
2 tablespoon

For the espresso syrup

Water
1/2 cup
Sugar
1/3 cup
Amaretto, Kahlua, or brandy
1 tablespoon

For the filling and frosting

Mascarpone Cheese
One 8 ounce container (homemade or store bought)
Confectioner Sugar
1/2 cup
Amaretto, Kahlua, or brandy
1 tablespoon
Vanilla Extract
1 1/2 teaspoon
Heavy Whipping Cream
1 cup
Cocoa Powder, For dusting
As needed

For homemade Mascarpone

Heavy Cream (not Ultra Pasteurized)
2 cup
Lemon Juice
1 teaspoon

Method :-

Homemade Mascarpone

  • Take a medium sized pan and coat the bottom of the pan with clarified butter/butter so that cream does not stick to the pan.
  • Pour the heavy cream into it and heat it stirring continuously until you can see small bubbles (just simmering) forming on the edges of pan. Boil it until the temperature reaches 190 degree Fahrenheit (thermometer will be very handy). This will take about 15 minutes with delicate heating.
  • Add the lemon juice and continue stirring gently until the cream curdles. The texture of this cheese will not be as ricotta or cottage cheese. The whipping cream will thicken so it can cover the back of your wooden spoon thickly.
  • Remove from the heat and let it cool for 20 minutes.
  • Meanwhile, line a sieve with four layers of dampened cheesecloth/muslin cloth and set it over a bowl. Transfer the mixture into the lined sieve.
  • Do not squeeze the cheese in the cheesecloth or press on its surface. Refrigerate for 8 – 12 hours to allow the cheese to drain. The longer you leave it to drain, the firmer your cheese will be.

mascarpone

Baking the cake

  • Heat oven to 350 degree Fahrenheit. Butter a 9-inch-square baking pan. Dust it with some flour and set aside. In a small bowl, sift together flour,baking powder, baking soda and corn starch. Keep it aside.
  • With hand  mixer fitted with the whisk attachment, beat egg yolks, vanilla, and 1/2 cup sugar on high speed for about 5 minutes until it becomes thick and pale. Wash and dry the mixer bowl and the whisk attachment.
  • Combine egg whites and salt in other bowl, and beat on medium speed until whites hold soft peaks. Now add  remaining 1/2 cup sugar and continue beating for about a minute until its stiff and glossy.
  • Fold the egg-white mixture into the egg-yolk mixture. In three batches, fold the reserved flour mixture into this new mixture. Transfer the batter into the prepared pan and bake it into oven until a cake tester (generally toothpick) comes out clean, approximately 35-45 minutes depending on oven heat.
  • Take out the pan and let it cool for 10 minutes. Transfer the cake to a wire rack to cool for about 20-25 minutes. Wrap it in plastic wrap until ready to use.

Espresso extract

  • Stir the espresso powder and boiling water together in a small cup until blended. Set aside.

Espresso syrup

  • Stir the water and sugar together in a small saucepan and bring just to a boil. Pour the syrup into a small bowl and stir the espresso extract and the liqueur or brandy. Set aside.

Filling and Frosting

  • Take a bowl and pour the heavy cream into it. With hand mixer whip the cream for about 10 minutes until it becomes firm peak. Set aside.
  • Put the Mascarpone, sugar, vanilla, and liqueur in a large bowl and whisk it until just blended and smooth. *(See notes)
  • With the help of rubber spatula gently fold the whisk whipped cream into the Mascarpone.

Assembling the cake

  • Cut the cake into vertical slices of 1/4 inch thick. Take an ungreased square/rectangular pan (mine was about 6 cup/1.5 l rectangle pan). Lay the slices into the square pan.
  • Divide the slices of cake, espresso syrup and filling into two batches.
  • Soak the slices with 1/2 of espresso syrup.
  • Spread 1/2  of the filling into the espresso soaked cake slices and smooth it with the help of spatula.
  • Repeat with the sponge cake, syrup and filling until the whole pan is filled up.
  • With a long metal icing spatula, smooth the frosting over the top.
  • With the help of a sieve dust the cocoa powder on top of the cake.You can also use some chopped chocolate in between the layers and top of cake.
  • Refrigerate the cake for at least 3 hours before serving. Before serving dust some confectioner/powdered sugar.

tiramisu1

Note :-

  • *If you are okay with raw eggs then you can beat one egg yolk along with vanilla essence, liquer, sugar and blend it until the mixture turns smooth and light pale in color. Then add the Mascarpone cheese into this mixture and gently fold.
  • I have cut the cake into slices to give a feeling of sponge fingers but if you want you can go with regular process of cake filling, by cutting cake into half lengthwise and there after adapting the same process.
  • Use of liqueur should not be skipped as it provides the basic taste of Tiramisu. Adding 1-2 spoon will have no effect on your body. I used Kahlua branded coffee liqueur.
  • I used Nescafe coffee as espresso powder.
  • You can decorate the cake with chocolate-covered espresso beans. You can also add some fresh fruits like strawberries for filling and frosting.
ravaidli1

South Indian food like Idli, Dosa, Uttapam are amongst my favorite breakfast items as they are nutritious, low in calories and filling. I remember, as a child, these dishes in our home were treated as delicacies. Even when we use to go out for dinner (rarely) my 1st choice would be sada (plain) dosa (savory crepes). I am certainly in love with this cuisine for its health benefits (one year to ninety years old can have it as its easy on digestion) and delightful taste. Idlis are soft, savory cakes which you can enjoy with sambhar (Spiced lentil veggie soup) and any type of chutney. Normally idlis are made from a fermented batter of rice and skinless split black gram (dhuli urad dal) which requires at least 2 days of preparation. Specifically, Rava idli is very easy, quick and handy to make as you can find most of the ingredients easily in your pantry. It is made of semolina (cream of wheat/Rava/Sooji) and acts as a savior when you don’t have any regular idli batter in hand. So lets start with the recipe.


Ingredients :-

Semolina/Rava
2 cups
Sour Curd
1/2 cup
Coconut Oil/any other
3 tablespoons
Fresh Coconut, thinly sliced
2 tablespoons
Urad Dal (Split skinless black gram)
1 teaspoon
Chana Dal (Split Bengal Gram)
1 teaspoon
Broken Cashews
1 1/2 teaspoon
Mustard Seeds
1 teaspoon
Green chillies, seeded and chopped
3-4
Curry Leaves
4-5
Ginger, finely chopped 1 inch piece
Salt
To taste
Fruit Salt (Eno) 1 tablespoon
Water
1 Cup

Method :-

  • Dry roast the semolina/rava in a heated pan.
  • Combine the semolina, curd, water, 2 tbsp of oil and salt together in a bowl. Whisk it continuously so that there is no lump. Keep aside for 30 minutes.
  • Heat the remaining 1 tbsp of oil in a small pan for seasoning. Add the urad dal, chana dal  and cashews. Fry it till they turn brown in color. Add mustard seeds.
  • When the seeds crackle, add the coconut, green chillies and curry leaves and saute for a few seconds.
  • Pour this  seasoning over the semolina batter and mix well.
  • Add the fruit salt and sprinkle a little water over it. When the bubbles form, mix it gently.
  • Pour spoonfuls of the batter into greased idli moulds (don’t let the batter fill till the brim) and steam on medium flame for 8 to 10 minutes. Check by inserting tooth pick in center of idli. If it comes out clean then its cooked.
  • Serve hot with any chutney of your choice. Below I have mentioned one of the chutney which goes well with this dish.

ravaidliwithchutney

For Onion Tomato Chutney

Ingredients :-

Onion (Preferably red onion), chopped
1 cup
Tomato, chopped
3/4 cup
Red chillies
3-4
Ginger, chopped
2 teaspoons
Oil
2 teaspoons
Salt
to taste
Curry Leaves
5-6
Mustard Seeds
1 teaspoon
Urad Dal (Split skinless black gram)
1 teaspoon
Chana Dal (Split Bengal Gram)
1 teaspoon

Method :-

  • Heat 1 tsp of oil in a pan. Add half of the curry leaves and  red chillies followed by the onions.
  • Add some salt and fry till they become translucent.
  • Add the chopped ginger followed by the tomatoes.
  • Fry till they become soft and remove from the heat.
  • Let it cool and grind it to a fine paste.
  • Heat other teaspoon of oil in a pan.
  • Add rest of the curry leaves and red chillies and saute it till fragrant.
  • Add urad dal and chana dal and let it brown.
  • Add mustard seeds and let it splutter. Switch off the heat.
  • Add the tempering/seasoning to the chutney and serve with idlis.

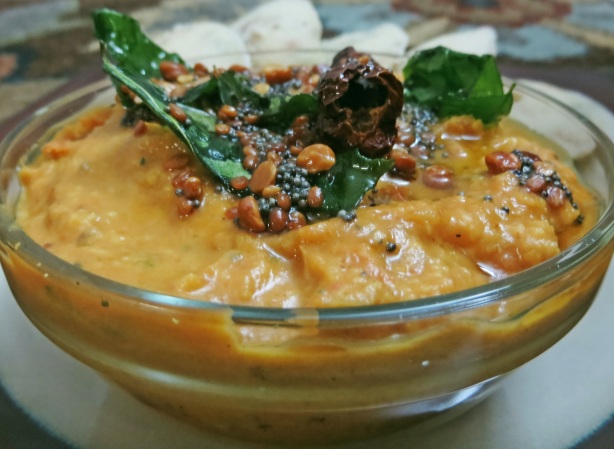
oniontomatochutney

Notes :-

  • If you don’t have eno use 1/4 – 1/2 tsp of baking soda. In this case, the batter needs to be fermented for minimum of 25-30 minutes to raise.
  • I always prefer using eno compare to soda since it soothes the stomach. It is available in any Asian/Indian store.
  • Curd should be sour enough to make good tasty idli otherwise it tastes bland.
  • You can add grated carrot, peas or chopped cilantro/coriander to add more flavor.
  • To get Idli with cashew visible on top first place one roasted cashew in each moulds and pour batter on top.
  • Consistency of batter and adding eno plays a major role in soft and fluffy idli.
  • You can drizzle some drop of ghee (clarified butter) on idlis while serving.
  • Idli moulds can be found in any indian store.

tawa paneer chaat

You might have eaten various forms of this crisp puris on various Chaat stalls on Indian streets like Paani Puri, Dahi Puri, etc. but this is a unique one with a filling of spicy paneer. I have adapted this recipe from my favorite chef Sanjeev Kapoor’s book Tawa Handi. As a small kid I religiously used to watch Khana Khazana on Zee Tv. At that small age I certainly didn’t know ABCD of cooking and hardly understood about the complex recipes but for sure I was (and still  I am) fascinated by the way he use to burst onto the scene with an easy, no-fuss cooking approach. My love for cooking is truly and sincerely inspired by him. This Chaat came out very good and you will relish every bite of it. Enjoy!


Ingredients :-

Cottage cheese (paneer), 1/2 inch cut in cubes
2 cup/500 gm
Crisp puris meant for paani puri
As required
Oil
3 tablespoons
Onions, chopped
2 large
Ginger paste
1 teaspoon
Garlic paste
1 teaspoon
Green chillies, seeded and chopped
3-4
Tomato Puree
3/4 cup
Pav Bhaji Masala 3-4 tablespoon
Salt
To taste
Chaat Masala 1 tablespoon
Fresh Coriander Leaves
3-4 tablespoons

Method :-

  • Heat oil on a tawa (griddle pan), add onions. Saute till brown.
  • Add ginger paste and garlic paste and continue to saute.
  • Add a little water and continue to saute for a minute. Add green chillies and saute for another minute.
  • Add tomato puree, pav bhaji masala, salt and chaat masala and continue to cook on low heat till oil separates from the masala.
  • Add paneer and half of the coriander leaves. Stir gently.
  • Check seasoning and cook on low heat for two minutes. Make small holes in each puri and stuff it with the paneer mixture.
  • Serve immediately  garnished with the remaining coriander leaves (which as you can see I forgot :))

pani puri chaat

Note:-

  • Stuff the filling inside the puris only when you are ready to eat otherwise puris will become soggy.
  • You can find this puris easily in any Indian/Asian grocery store.
  • Increase/decrease the quantity of chilli as you want.

pasta2

I love Italian food whenever the cravings for something cheesy sets in. Italian cuisine is one of the oldest in the world, which can be traced back to the 4th century BC. Italian cooking is wholesome and flavorful. The most essential part of Italian cooking is Olive oil. So never try to replace it with any other oil as the dish will loose its authenticity. For me Italian food never completes without flavor of garlic. Garlic works magic with this cuisine and its characteristic flavor adds dimension to just about any dish. Here is my own version of Italian style layered Pasta. This oregano-flavored, tangy, crunchy macaroni pasta uses minimum of cheese and tastes delightful. But cheese lovers can increase the amount of cheese as required.

Ingredients :-

Green Peas
2 cup
Mushrooms
20-25
Potatoes, cut into Roundels
2 large
Macaroni
1 cup
Butter
6 tablespoon
Ginger, Chopped
1 inch piece
Onion, Cut into Rings
1 medium
Sugar
To taste
Garlic, Finely chopped
10-12
Tomato Puree
3-4 tablespoon
Black Pepper Powder To taste
Dried Parsley leaves
1 teaspoon
Dried Oregano
1 teaspoon
Olive Oil
1 tablespoon
Salt
To taste
Parmesan Cheese
1/4 cup
Lime Juice
1 teaspoon

Method :-

  • Parboil the potatoes in plenty of salted water.
  • In other pan boil the macaroni as instructed till its al dente (firm but not hard).
  • Drain and set aside both potatoes and macaroni.
  • Blanch the green peas for three-four minutes. Separate the caps and stalks of mushrooms.
  • Heat two tablespoons butter in a pan, add ginger and onions rings and saute for two-three minutes.
  • Add peas, sugar, salt, a pinch of oregano and parsley leaves and cook for another two minutes.
  • Heat two tablespoons of butter in another pan and saute garlic for a minute.
  • Add mushroom caps and toss on a high heat for two minutes.
  • Add tomato puree, salt, pepper powder and continue to cook for two-three minutes more.
  • Heat the remaining butter in a third pan. Add a pinch of oregano and parsley leaves to it. Saute the parboiled potato slices along with salt for three-four minutes or until golden brown.
  • In the same pan add olive oil and add rest of the oregano and parsley leaves. Add the boiled macaroni and give it a good mix. Turn off the heat.
  • In a serving plate, pile up the peas, arrange macaroni and then mushrooms on top of it. Arrange the potato slices around the peas.
  • On top drizzle the lime juice and sprinkle Parmesan cheese. Serve hot.

pasta1

Note :-

  • If you are in mood of more creamy texture you can increase the amount of cheese.
  • Instead of  butter you can use olive oil.
  • You can use any kind of pasta you like.
  • You can add any type of cheese like Romano, Mozzarella etc.
  • If available use fresh Parsley leaves instead of dried one. Nothing can beat fresh produce.