Posts Tagged ‘vegetarian’

dsc_1312dsc_1317-tile


As a child, I would have never thought in my dreams that I would grow up and do any kind of baking. It was that science which would be better left untouched. I remember my mother used to bake simple no-frill cakes on special occasions and she used to literally force me to help her. I cant tell you how much I hated being helper to my mom in the kitchen especially while baking.Those days we didn’t have any hand mixer or blender at our house to mix the batter and we had to mix it with a simple spatula. That was a very hard job to do as my mom use to make cake with malai(If interested in malai you can read more here wiki) and mixing it in a smooth mixture was a tedious thing to do. I use to run away as soon as mom would start baking. Such was the fright!  And now I am here trying to bake my own breads and buns. I am surprised with the transformation since now I am trying to bake so many different things. There is always something to learn and I am certainly proud that I am ready to experiment or try new things. The fresh smell of baked goodies motivates me to try various things.

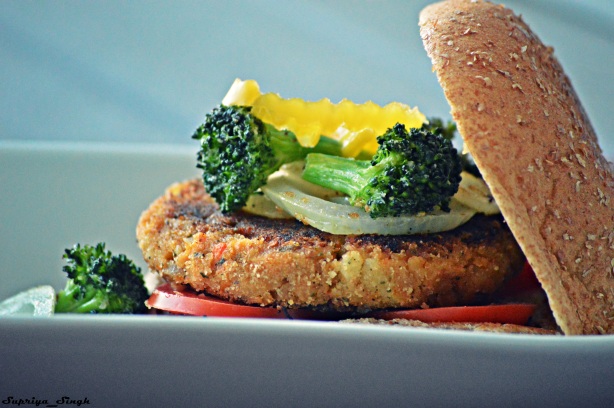
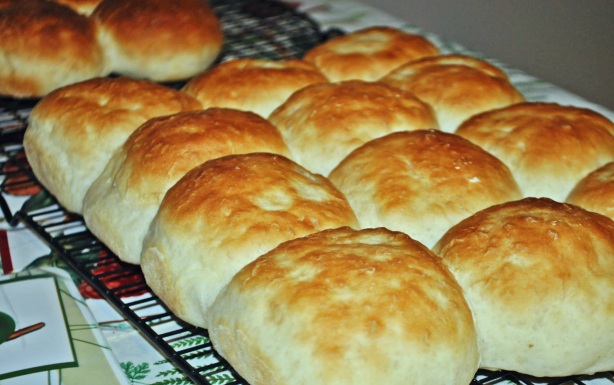
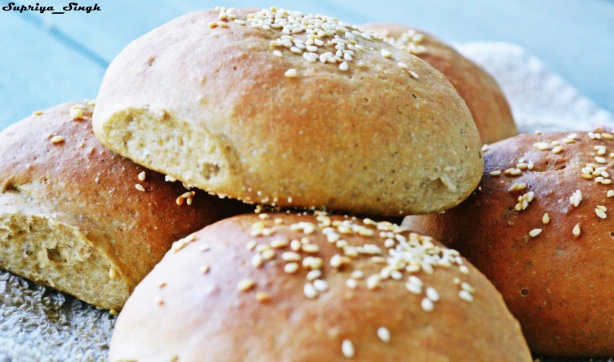
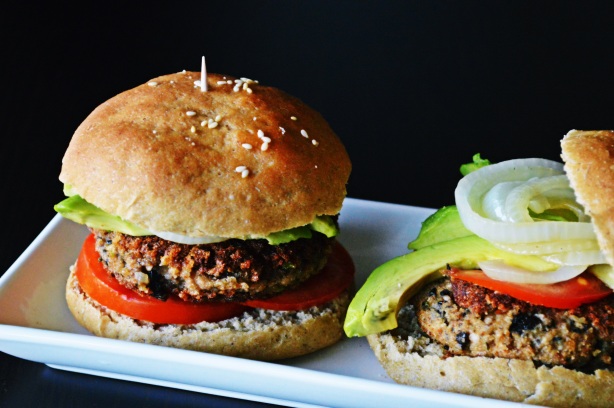
Coming back to the recipe I wanted to bake a burger bun since long. This multi grain burger bun and tofu patty makes a complete hearty and healthy meal. These buns are fresh and many  times better than the store bought buns as it is healthier due to use of multi grain flour and less sweeter. They taste so delicious that you can eat as-is without any patty or other toppings. Once you bake at home you will never look back to the store bought ‘unhealthy’ buns. The patty I made contains black bean and tofu which is not only healthy but also very yummy. You can enjoy the buns with any patty of your choice

Ingredients :-

For Whole Wheat/Multigrain  Buns :-

Whole Wheat/Multigrain Flour
1.5 Cups
All purpose flour
1.5 cups
Baking Soda
1/2 teaspoon
Salt
1 teaspoon
Active yeast
1 1/2 teaspoon
Warm water
1.5 cups
Sugar
2 teaspoon
Olive/Vegetable Oil
3 tablespoon

For Black Bean and Tofu Patties :-

Black Beans, boiled and drained
1 Cup
Extra Firm Tofu
1 block
Green Bell Pepper/Capsicum, finely chopped
1/4 Cup
Onion, finely chopped
1/4 cup
Garlic Powder
1 teaspoon
Black Pepper Powder
1/2 teaspoon
Garam Masala Powder
1 teaspoon
Bread Crumbs
1/4 Cup
Salt
to Taste
Oil, For frying
As needed

For Assembling the Burger :-

Multigrain Buns
8
Onion, Cut into roumdels
1 medium
Tomatoes, Cut into roundel
2 medium
Tomato Ketchup
As required
Mayonnaise
As required
Cheese Slices
As required
Avocado Slices
As required


dsc_1317

Method :-

For Whole Wheat/Multigrain  Buns :-

  • Warm the water in microwave. It should be lukewarm.
  • Take half cup of water in a bowl and add sugar and yeast to it. Mix it well and keep it aside until it starts frothing. It will take about 10 minutes.
  • In another big bowl take wheat flour, all purpose flour, baking soda and salt and mix it until well combined.
  • Add olive oil, yeast mixture to it and knead it well. In between you can add some warm water if the mixture seems dry.Make a smooth and soft dough.
  • Place the dough in a large greased bowl and cover it with dampen tissue paper or kitchen towel in a warm place for about 1 and half hour. By that time dough should have risen to double size. If not keep it for half an hour more.
  • Punch the risen dough with your hands and knead it for 2 minutes. Divide the dough into 6-8 equal parts depending on how big you want.Shape them into smooth balls. Sprinkle some sesame seeds on top and brush it with olive oil.
  • Place the balls into greased tray  equal distance and keep them in warm place so that they can rise again in double size. This method is proofing. Don’t forget to cover the dough balls with dampen towel.
  • Preheat the oven to 350 degree fahrenhite/ 180 degree Celsius  and bake the buns for about 25 minutes or until the top is lightly browned.
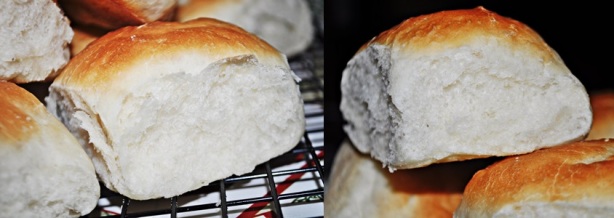
  • Take it out and keep the tray on wire rack. At first the buns will seem hard but they will turn soft as soon as they cool down. Enjoy it with your favorite patties or just like that.They taste so good on own.

For Black Bean and Tofu Patties :-

  • If using raw black beans soak them for about 2-3 hour and blanch them or cook in pressure cooker for 10 minutes.
  • Heat 1 teaspoon oil in pan. When hot add chopped onion and green bell pepper. Saute it for about 2 minutes and take it out in a bowl and let it cool.
  • Add half of the tofu and boiled beans in food processor and process it for a coarse mixture.
  • In the bowl which you put sauteed vegetables add the tofu and black bean mixture. Also crumble the remaining tofu and add it in this mixture.
  • Add the garlic powder, garam masala powder, black pepper powder and salt to the mixture and combine it well. Refrigerate it for about half an hour.
  • Take out the mixture from freeze when you are ready to make patties. Add bread crumbs to the mixture. Divide the mixture in equal parts and shape them into patties
  • In a griddle add about 1 tablespoon of oil and place the patties into it when oil is hot.
  • Cook evenly on both sides and keep it aside

For Arranging the Burger :-

  • In the same pan in which you made patties add the onion roundels with some dash of salt and drizzle of oil and cook for 1 minute.
  • Cut the burger buns horizontally into half and toast them on the griddle.
  • In a small bowl mix the mayonnaise and tomato ketchup to form homogeneous mixture.
  • Put mayonnaise ketchup mixture in both part of toasted buns. Add tomato roundels and put a pinch of salt and peppercorns.
  • Place the patty on top of it and then add avocado slices. On top add the sauteed onion roundels and place the other half of toasted bun on top.
  • If you want to add cheese slices place it on top of patties. I didn’t want the cheese so I skipped it.

dsc_1326

Notes :-

  • Proofing is very important for the buns. Proofing means the final rise of dough before baking. So don’t skip it.
  • You can even brush the buns with melted butter to get shiny crust.
  • You can use canned beans instead of fresh if you are running out of time.
  • If patty doesn’t hold the shape you can roll them in bread crumbs before grilling.


DSC_1049

So I am back with one more ice cream recipe. I thought before the harsh winter knocks at your door why not enjoy the full on summer with cold novelties and treats. And whats better than a scoop of ice cream. Or a tub? That sounds better I must say. By the way you don’t need any excuse of weather to enjoy any food. . . For me, weather has never been a decisive factor to enjoy any type of food. I can very well enjoy a hot bowl of  soup in a hot summer day or ice creams and other cold novelties in winters. Ice cream in winters is actually fun as there is less of dripping and melting. So you can enjoy it long and you will also have less people to share, I guess so. Food is all about comfort and whats better than an ice cream. It works well even when you are having a bad day and I think many of you would agree to that. I am one of those guilty mom who sneakingly enjoys her favorite ice cream or cake when the little one is taking his afternoon nap and blame it all on my mood, bad day ,exertion or whatever works. So point here is food gives me inner pleasure and it would be same for many of my kind.

My motto for this summer was to try various interesting flavors. The Ice cream recipe which I am sharing here today is unique and my second favorite flavor after Mango. Paan or betel leaves are very good for digestion and is very famous in India as a mouth freshener. Mostly its enjoyed after a meal but people who loves it can be seen chewing anytime. The thought of Paan ice cream would not have strike me had I not tried it on my own. And I instantly fall in love with the fresh flavors and pleasant taste. So what are you waiting for. Try this and do let me know your reviews.
Ingredients :-

Betel Leaves, washed and finely chopped
5
Fennel Seeds
1 teaspoon
Pitted Dates, Finely chopped
2 tablespoon
Tutti Frutti/Candied fruits
2 tablespoon
Gulkand/Rose petaled jam
2 tablespoon
Rose essence
1/4 teaspoon
Cardamom Powder
1/4 teaspoon
Cashew and Almond, chopped
2 tablespoon
Whole Milk, chilled
1/4 cup
Condensed Milk, chilled
1/2 cup plus 2 tablespoon
Heavy Whipping Cream, chilled
1 cup

DSC_1071

Method :-

  • Soaked the dates in half of the milk for about 1 hour.
  • Put one big bowl along with whisk attachments in refrigerator for 15- 20 minutes
  • In a blender jar add the chopped betel leaves, fennel seeds, gulkand, dates along with remaining milk and blend all the ingredients very well to form a homogeneous mixture.
  • Beat the chilled whipping cream in the bowl on medium speed until the cream is nice and thickened.
  • Add condensed milk to it and beat for 1 more minute.
  • Now add the betel leave paste, tutti frutti, rose essence, chopped nuts and cardamom powder to the ice cream base and fold them gently into the mixture until well combined.
  • Transfer the ice cream mixture into airtight container.
  • Garnish it on top with some tutti frutti and chopped nuts.
  • Cover it tightly with plastic foil wrap. Make sure the plastic foil touches the ice cream mixture everywhere and there is no air between the ice cream mixture and plastic foil wrap.This ensures that there is no ice crystal formation in the ice cream. Finally put the air tight lid.
  • Let the ice cream set overnight.
  • Enjoy it all alone or if you are generous enough to share enjoy it with your loved ones.

DSC_1076


Notes :-

  • Tutti Frutti (Candied fruits), betel leaves, gulkand( rose petaled jam), fennel seeds and rose essence can be easily found in any Indian grocery store.
  • Optional – If you want you can add 1-2 drops of green food color to enhance the color of ice cream. Personally I don’t like food colors so I skipped it. 
  • As always mentioned in all my ice cream recipes chill the ingredients specially the whipping cream, condensed milk, evaporated milk if using any.

DSC_1085

Every time I decide I will cutoff sugar from my diet, I get tempted and lured by some interesting dessert recipes. When it comes to ice cream, there is hardly anyone who can resist temptations. Ice cream is utterly creamy and melt in mouth delight. This year has been the ‘ice cream’ year for me as I have tried various varieties of it since onset of summer. I am not that fond of eating ice cream except for few selective flavors but my near and dear ones do like it which motivates me to try different varieties and when they give heads up it gives me immense satisfaction. Of course, who doesn’t like all the praises attached with all the hard work you have put in! It really makes my day happy happy.

Today I have brought you the smoothest and creamiest concoctions that can me made right into your kitchen with no effort at all. I could not stress on the fact that it tastes so so much like store bought ice cream. Before I go gaga about this ice cream I just want to let you know I didn’t want to make it in the first place because of its content – Coffee and Chocolate – which are not in my favorite list. Once it was made, I was very pleased and actually liked the taste of it. The secret (or not so secret) about this ice cream is a key ingredient – Mascarpone cheese. I have never tried my hands on with Mascarpone cheese except Tiramisu cake. After the outcome with this ice cream, I think I will try this ingredient more often in my dessert and specially with ice creams. The Mascarpone cheese leads to less or no churn and less work with great results. So let not go much into talking and start with the recipe. Do try it once and let me know your inputs and reviews.

Ingredients :-

Heavy Whipping cream, chilled
1 cup
Mascarpone Cheese
6 oz
Hazelnut, Toasted and roughly chopped
1/2 cup
Coffee powder, any of your favorite
2 tablespoon
Condensed Milk, chilled
1 cup
Chocolate Chips
1/2 cup
Chocolate Shaving, optional for decoration
2 tablespoon


DSC_1082

Method :-

  • Brew the coffee powder in 2 tablespoon of water and let it cool completely.
  • Put one big bowl along with whisk attachments in refrigerator for 15- 20 minutes
  • Beat the chilled whipping cream in the bowl for about 10 minutes till it becomes dense and peaks are soft.
  • Add the condensed milk, mascarpone cheese, brewed coffee and beat on high for 5 more minutes until the mixture is well combined.
  • Finally add the toasted hazelnuts and chocolate chips and fold it gently.
  • Take a wide glass pan or loaf pan and pour the mixture into it.
  • Spread Chocolate shavings on top of it.
  • Cover it tightly with aluminum foil or plastic foil wrap so that there is no ice crystal formation. Finally put the air tight lid.
  • Let the ice cream set overnight.
  • Enjoy it as it is or with some drizzled chocolate syrup.

DSC_1095

Note :-

  • Amount of sweetness can be increased or decreased depending on individuals taste.
  • Chiller the ingredients are better the ice cream will be. This is the mantra for homemade ice creams.

DSC_1030
Burger! It’s mostly termed as a junk and unhealthy food but it can be as healthy as any food depending on the condiments and ingredients you pick and choose. A homemade burger, or for that matter any dish, can be tailor-made depending on individual choices. Like for example if you want to skip mayonnaise you can add homemade guacamole (instead of store bought since I like it fresh) which is not only healthy and natural but delicious too. I have attempted to make the burger as healthy and yummy as possible that you will probably not miss the burger from your favorite joint. Am I exaggerating? Nope, cause it tastes damn delicious and is full of healthy & nutritious ingredients which will make you forget all the guilt you have of burger. It’s free of trans fat, chemical & preservatives which you get in frozen burger patties. Here I have not used any cheese or mayonnaise, but of course if you are making this for kid you can’t omit cheese as its good for them. The key ingredient of this dish is soy granules which is made from soy beans and is protein rich. The Soy beans assist in controlling blood sugar and cholesterol levels. Besides the popular Tofu (Bean Curd), Soybeans are consumed in direct and indirect way in Indian and Asian cuisine. In most Indian grocery stores in the USA, you will be able to find Soy sauce, Soy nuggets, Soy granules, etc. So what are you waiting for. Do try this and let me know how you find it.

Ingredients :-

Soy granules 1 cup
Burger buns 4
Oil 4 teaspoons
Salt to taste
Onion 3 medium
Green Chilies, Chopped 2
Tomato Ketchup 6 tablespoons
Mustard Paste 2 tablespoons
Cilantro, finely chopped 2 tablespoons
Potatoes, Boiled and grated 2 medium
Fresh whole wheat bread crumbs 1/2 cup
Red Chili Powder 1 teaspoon
Tomatoes, Sliced 2 medium

Method :-

  • Roast the Soy granules for 4-5 minutes on medium heat until lightly roasted. Allow it to cool.
  • Soak the granules in sufficient water for 10 minutes. Squeeze the water out and put it in a bowl. Keep it aside.
  • Chop one onion and cut other two into roundels.
  • Heat two teaspoon of oil in a pan. Add chopped onion and green chilies and saute.
  • Add soy granules, two tablespoons of tomato ketchup, one tablespoon of mustard paste, salt, chopped cilantro and continue sauteing till dry.
  • Remove from heat and transfer into a bowl. Keep aside to cool it slightly. Add boiled and grated potatoes, bread crumbs and mix properly. Divide the mixture into four equal proportions.
  • Take one portion of the mixture and shape it into patties. Roll it into some more breadcrumbs and keep aside. Similarly make rest of 3 patties.
  • Heat little oil on a griddle pan. Place the patties on the pan and cook it both sides until golden brown.
  • Separate onion roundels into rings. Heat two teaspoons of oil in a pan and saute the rings until golden brown. Drain and set aside.
  • Cut the burger buns. Heat a tawa/griddle and roast the burger buns. Apply the remaining tomato ketchup to the burger bases, place some tomatoes roundel, caramelized onion rings over it and then place the patties over it.
  • I didn’t have lettuce so I sauteed some broccoli florets with garlic in one teaspoon of olive oil and placed it in top of patties. These broccoli are also side dish for burgers.
  • Similarly prepare rest of the buns. Apply mustard paste to the top half of the burger bun and place over it.
  • Secure with a toothpick and serve hot.

DSC_1035

Notes :-

  • Amount of chilies depend on your taste so you can increase or decrease accordingly.
  • Here I have used sauteed broccoli as side but if you want to go traditional but healthy way you can make baked potato wedges.
  • To make the burger even more healthier you can use one parboiled grated carrot to the mixture. 

DSC_0997
Being mother is hard, fun, challenging and life changing. Each day you learn so many things from your child, from the circumstances, etc., you hardly get time to enjoy yourself by having your own personal time. When things are tough, you have to find alternate ways of keeping yourself busy and overcome unwanted / unpleasant situations. Luckily, there is food to the rescue. I eat or make food when I feel sad, overwhelmed, exhausted, happy, etc. Creating something new and healthy gives inner satisfaction to my soul. Sometimes they do not turn out as I wanted (and I get mad) but slowly I start analyzing positives and learn from mistakes.

Coming back to this post, it’s one of the most delicious dishes and can be made in a jiffy. This recipe makes good use of the leftover rice (brown or white) which otherwise might be sitting idle in refrigerator. I always like fresh ingredients hence using fresh corn in this recipe will make it taste even better. The patties can form base for many dishes like burgers, wraps, sandwiches, subs etc. I have used them in the form of a wrap and it becomes the wholesome dinner/lunch OR can be enjoyed as snacks with a hot cup of tea.  You can even add grilled shredded chicken or scrambled egg to make it more hearty and meaty. The combination is endless so get your creative mind rolling and try it on. It also works well with picky toddlers/kids who likes specific type of food.

Ingredients :-

For Corn Rice Patties/Cakes:-

Fresh boiled corn/Canned corn kernels 1 and 1/2 cup 
Oil 4 tablespoons
Onions, chopped 2 medium
Cilantro, finely chopped 2-3 tablespoon
White/Brown rice, boiled 1 and 1/2 cup
Potatoes, peeled and boiled 2 medium
Salt to taste
Green chillies, finely chopped 2
Crushed red chillies 1/2 teaspoon
Fresh bread crumbs 1 cup

For Wrap/Roti

Whole wheat flour 1 cup 
Oil 1 tablespoon
Salt a pinch

DSC_1004
Method :-

  • If you are using fresh corns take out the kernel and boil it until soft. Discard the extra water.
  • Heat 2 tablespoon oil in a nonstick pan. Add onions and saute it until onion turns light brown.
  • Add the corn kernels and saute for 2-3 minutes.
  • Take out the onion corn mixture in a bowl.
  • Add rice, mashed potatoes,salt, green chilies, crushed red chilies, cilantro leaves and mix well mashing the contents slightly.
  • Add the fresh breadcrumbs and mix well. Keep the mixture aside for 10-15 minutes.
  • Heat 2 tablespoon oil in another non stick pan. Divide the mixture into equal parts and make oval or round shape patties/cakes out of it.
  • Place the patties on the second pan and cook each side till both sides are equally golden.
  • Serve hot with any sauce, salsa or tomato ketchup. 
  • For oven spread the patties in a baking sheet and spray a little oil over them.Then cook them in a preheated oven of 350 degrees Celsius for 15 minutes.
  • If you want charred effect broil it both sides for 2 minutes each.

For wraps :-

  • Combine all the ingredients in a bowl and knead into a soft dough using enough water. Keep aside.
  • Divide the dough into four equal portions and roll out each portion into a round circle approx of 8 inch diameter using a little flour.
  • Heat a non-stick griddle and lightly cook the rotis/wraps on both the sides. Keep aside.

Assembling :-

  • Cut julienne of a medium onion.
  • Just before serving warm a roti on griddle.
  • Place the roti/wrap on a clean, dry surface and spread one teaspoon of green chutney, ketchup or any of your favorite sauce or salsa on the wrap/roti.
  •  Arrange 2 patties/cakes in a row in the center of the roti/wrap
  • Spread some onion julienne over the patties.
  • Roll the wrap tightly and serve it hot.

DSC_0984

Notes :-

  • Instead of rotis you can try this rolls with soft tacos.
  • You can even deep fry the patties/cakes.
  • Amount of chillies can be increased or decreased according to your taste. 
  • If you like the taste of mint leaves you can add some of it in patties.
  • Here I have used yogurt sauce for the rolls. If you want you can follow the recipe for yogurt sauce here Falafel – The Healthy Way

DSC_0216

While browsing through the food pictures from last year, I came across above picture and thought to post it on the blog. Its not one of the best pictures I clicked but I did not get time to bake this cake again for new pictures. There are too many dishes to experiment with and hence most of the times I am not able to re-create my old recipes. I love this cake for its sweet and tangy taste. The sweetness comes from blueberry and tangy taste comes from fresh squeezed orange juice. In the picture you can see how hastily I cut the cake before it cooled down. I am just like that – impatient. I couldn’t wait for the cake to cool down to have a good slice as I wanted to taste it so badly. That will be my advice and tip for any cake – make sure that the cake is not hot/warm and is cooled before cutting the slice from it. You will get the best slice of cake if kept in freeze for at least one hour.You can relish this cake with a cup of milk, coffee or tea. This cake can be a prefect gift to someone you love, someone special like mom as mother’s day is nearby. 

Ingredients :-

All purpose flour 1 and 1/2 cup minus 3 tablespoon
Blueberries 1 cup
Orange juice 1/2 cup
Orange zest 1 tablespoon
Sugar 1 cup
Baking powder 1 and 1/2 teaspoon
Baking soda 1/2 teaspoon
Salt 1/2 teaspoon
Yogurt 1/2 cup
Cornstarch 3 tablespoon
Oil 1/2 cup
Vanilla essence 1 teaspoon

DSC_0225

Method :-

  • Preheat oven to 350 degree Fahrenheit.
  • Coat a 9×5 inch loaf pan well with non-stick cooking spray or butter. You can even line the bottom of pan with parchment paper.
  • Wash the blueberries and pat them dry with a kitchen towel. Add some all purpose flour to the blueberries once they are dry and give a good mix. Keep it aside.
  • Sieve the all purpose flour/maida along with cornstarch/cornflour twice to ensure the even mixing.
  • Mix yogurt and sugar in other bowl and add baking powder and baking soda and let it rest for 2-3 minutes so that mixture turns bubbly and frothy.
  • After the mixture turns frothy add oil, vanilla and orange juice to it. Mix well.
  • Add the flour mixture one tablespoon at a time to the wet mixture and mix well. Do not over mix.
  • In the end add the blueberries and orange zest and fold them gently.
  • Put the batter into the prepared loaf pan and bake for 45-50 minutes or until toothpick inserted comes out clean.
  • Allow to cool it on wire rack. Let it completely cool before slicing and serving.

DSC_0208

Notes :-

  • You can use orange flavored orange yogurt to enhance the taste
  • You can use cranberries instead of blueberries or mix of both as as both goes well with orange 
  • If you see the top browning too fast loosely cover the cake with aluminium foil.

DSC_0098
Continuing my commitment to post recipes regularly, I started to look at the pictures I took in the past to inspire me for the next post. It was then I stumbled across above picture and started writing this post. I love these buns aka paav aka dinner rolls especially the ones made in Mumbai. They are so fresh, soft, buttery and delicious. The paav forms a base of many popular street foods of Mumbai like Paav Bhaji, Vada Paav, Dabeli, Misal Paav, Masala Paav, etc. Being away from Mumbai since a long time and unavailability of good paav in our town, I decided to try making them. I was tired of using burger buns brought from the store since they do not taste that great with our street food. What’s so special about the laadi paav? It’s the pillow-like texture which you can eat all the time as it is. They are light yellowish brown in color. The overall effort put in to making laadi paav is little bit overwhelming and tedious but results are awesome. Now, I do not fear to make them at home and have stopped buying buns from the store.
Ingredients :-

All Purpose flour 3 cups
 Active Dry Yeast 1 packet
Salt 1 teaspoon
Sugar 2 tablespoon
Butter, room temperature 3 tablespoon 
Water, lukewarm 1 and 1/4 cup


DSC_0116-horz

Method :-

  • Mix yeast and lukewarm water together along with sugar. Give it a stir and keep it aside until frothy.
  • Add salt and butter to the yeast and stir well.
  • Slowly add the flour one cup at a time to this mixture until well incorporated. 
  • The mixture will be slightly sticky but don’t worry. The stickiness will be removed while kneading.
  • Lightly dust your clean kitchen counter. Start kneading the sticky dough into the surface for about 10-15 minutes. This process needs lots of your muscle power as you need to knead the dough very well as kneading will help the gluten to develop in dough. It is ok to use some dry flour if needed while kneading ( approximately 2 tablespoon ).
  • Keep the dough into a large lightly greased bowl and cover it with a plastic wrap or damp cloth.
  • Keep it aside for one hour or until the dough is doubled.
  • After an hour knead the dough which would have doubled by size for 5-8 minutes. 
  • Divide the dough into 12 equal pieces and roll it into round shapes. Place the balls on greased baking tray leaving some space in between like about 1 inch.
  • Again cover the dough balls and let it double again. It will take about 45-60 minutes. The balls will get stick to each other.
  • Bake them in a preheated oven at 350 F for 15-20 minutes or until lightly browned.
  • Cool them for half an hour before eating as they will feel hard when hot but will turn super soft once cold.
  • Enjoy it as Daabeli, with Pav Bhaji or just simple Maska Pav ( All Mumbai streetside dishes)

DSC_0107

Notes :-

  • You can make this buns/pavs with half all purpose flour and half whole wheat flour or even with whole wheat flour. The whole wheat flour will be bit dense.
  • Remember to use good quality yeast. Also yeast reacts best with sugar along with lukewarm water. So water should not be cold or very hot. Lukewarm water has the best temperature for reaction of yeast.
  • Ladi Pav/Bun will stay fresh when stored in air tight container but its most delicious when eaten fresh. 

DSC_0686

As I promised myself to post recipes of many of the dishes I made in 2015, I am trying to live up to it. It was tough to choose a specific one from the pool but I picked this one since I love this dish a lot. Its closer to my heart since it won as the ‘best dish’ in the food event at my husband’s office. This is one of the famous recipe of the chef Sanjeev Kapoor and it was showcased in Masterchef India too. Its a hard core ‘Punjabi recipe’ since its rich with cashew paste and cream, melt-in-mouth fried koftas and delicious gravy. Ooh la la, I am drooling. If you are a ‘calorie conscious’ person,  you will definitely need tweaks to make it low on calories. You will not be able to resist temptation of this alluring dish. I have tried both the versions and the no-fry-no-cream-no cashew version tastes as good as the original one. I have tried my best to replicate this dish but don’t know if it will match up to what was made by the great Sanjeev Kapoor, nevertheless, I am very satisfied with the end result. Please check the Notes section where I have mentioned some points for making this dish in alternate way keeping healthy options in mind. I hope you like it. Enjoy!!!

Ingredients :-

For Koftas :-

Fresh Spinach Leaves 5 bunch
Cottage Cheese/Paneer 1 cup
Salt  to taste
Green Cardamom Powder  1-2 pinch
Oil 2 tablespoon
Cumin seeds 1 teaspoon
Garlic, finely chopped 6-7 cloves
Green Chilli, finely chopped 5-6 
Gram flour(besan) 4 tablespoon
Turmeric powder 1/4 teaspoon
Corn flour/Corn starch 1/4 cup
Oil, for deep frying as required

For Makhani Gravy :-

Tomato, roughly chopped 10-15
Oil  2 tablespoon
Green Cardamom 10-12
Garlic Chopped 10-15 cloves
Salt to taste
Red chili powder 2 1/2 teaspoon
Butter 1/2 cup
Fenugreek leaves (methi), roasted and powdered 2 teaspoons
Honey 3 teaspoons
Fresh cream 1/4 cup
Boiled cashew paste 2 tablespoon

DSC_0691

Method :-

  • Blanch the spinach leaves in 4-5 cup of water for 2 minutes. Drain and put it in cold water or ice water.
  • Drain out all the water and then chop it finely. Keep it aside to cool in a bowl.
  • In other bowl mash the paneer along with salt and cardamom powder. Divide it into 8 -12 equal portions and roll into bowls.
  • Heat two tablespoon oil in a non stick pan and add cumin seed. After 2 minutes add garlic and green chilies and saute for 1 minute. Add the gram flour and saute for 1-2 minutes till gram flour gets little roasted and starts giving nutty flavor. Add the turmeric powder and stir.
  • Add the spinach and salt and saute. Keep stirring it continuously until the mixture is dry and starts leaving the sides of pan. Keep it aside to cool. Divide the spinach into as many equal portions as paneer balls.
  • Take water in a bowl and wet your palms. Take each spinach portion , flatten it onto your palm and place a paneer ball in the center. Gather the edges together and shape into a ball. Take cornstarch in a plate. Roll the stuffed spinach balls into it and shake the ball lightly to get rid of extra cornstarch. In same way make all the spinach balls.  Don’t forget to wet your palm with water in between as the spinach mixture can get sticky.
  • Heat oil for deep frying in pan. Gently slide the spinach balls when oil is hot and fry on low to medium heat until it turns golden brown. Drain it onto an absorbent paper and keep it aside.
  • Alternatively you can prepare a baking tray by spraying oil on it. Place the Spinach balls in it. Bake it for 15 minutes at 400 Fahrenheit and then broil it for 2-3 minutes on one side and again 2-3 minutes on other side.
  • For makhni gravy puree the tomatoes till smooth. Heat the oil in a deep non stick pan as the gravy tends to splutter a lot. Add the butter along with two tablespoon of oil as butter tends to burn.
  • When butter is hot add Green cardamoms and finely chopped garlic. Cook it for 1 minute and then add tomato puree. Let it cook until the rawness of tomatoes goes off and the puree leaves the oil. It will take about 20-25 minutes.
  • Add boiled cashew paste and cook it for more 5 minutes. Add salt, honey, fenugreek leaves, red chilli powder and cook it for 5 minutes. Add 1/4 cup water and let it simmer. Add the cream and cook for 2 minutes more. Your makhani gravy is ready.
  • Pour the makhani gravy into a serving bowl and place the koftas on the gravy and serve immediately. 
  • If you are not serving immediately keep the koftas and makhani gravy separately. While serving reheat both of them seperately and serve together as Koftas will turn soggy if kept for long in the gravy and reheated. Enjoy it with Naan or Tandoori Roti. 

DSC_0694

Note:-

  • You can even use garlic paste instead of chopped garlic in the makhani gravy.
  • For the healthier version you can skip the butter and cream part. Instead of cream add 1/2 cup of milk.
  • Instead of making your own tomato puree you can use 2 cup of ready made tomato puree. But mind you the homemade puree tastes much better and gives a character to the dish. I personally like the homemade one.
  • Original dish didn’t demand for cashew paste so you can skip it. If trying for healthier version add 2 tablespoon of boiled almond paste.

DSC_0554

Ah! It’s been such a long time, since my last post was published 7 months ago. I have been consistently inconsistent in publishing recipes in 2015 (its typical me). We traveled a lot in 2015 and it was very difficult to keep up with posting recipes(Again one lame excuse). Last year I striked-off one item from my bucket list of visiting Switzerland. It was my dream since I was 10. The mesmerizing beauty and yummy food (especially cheese and milk) made this trip very awesome. Now coming back to my post, this is a very easy-peasy recipe. Once you make the pesto its very easy to assemble the sandwich.  I personally like basic pesto a lot since you can make endless dishes out of it. I hope and wish to write more dishes this year :). For basil pesto you can find here https://love2experiment.wordpress.com/2015/05/28/baked-pesto-pasta-muffins/

Ingredients :-
For Sandwich :-

Basil Pesto
1/2 cup
Bread Slices
8
Tomato, cut in roundels
1 small
Onion, cut in rings
1 small
Zucchini, cut in roundels
1 small
Eggplant, cut in roundels
1 small
Mozzarella Cheese, Shredded
1/4 cup
Salt
to taste
Black Pepper Powder
to taste
Garlic Powder
1/4 teaspoon
Olive Oil
as required

For Roasted Baby Potatoes :-

Baby Potatoes 8-10
Cherry Tomatoes
4-5
Crushed black Peppercorns
1 teaspoon
Sea Salt
to taste
Olive oil
2 tablespoon
Basil Pesto
1/2 cup

DSC_0540

Method :-

For Sandwich :-

    • Marinate the zucchini and eggplant with salt, pepper, 1 teaspoon of olive oil and garlic powder.
    • Heat the grill pan and spread one teaspoon of oil uniformly.
    • Grill the zucchini and eggplant on both sides till they are 3/4th done.
    • Spread the pesto on each bread slices uniformly
    • Now arrange the grilled eggplant, zucchini, onion rings and tomato roundels uniformly on 4 bread slices.
    • Spread mozzarella cheese equally on the four bread slices
    • Cover it with rest of the four slices.
    • Spray oil on panini press/Sandwich maker and grill the sandwiched till well toasted and golden in color.
    • Enjoy it hot with ketchup.

For Roasted Baby Potatoes :-

    • Preheat oven at 350 degree Fahrenheit.
    • Marinate potatoes with sea salt, 1 teaspoon of olive oil, crushed peppercorns in a cake pan and mix well
    • Put the pan in preheated oven and bake for 40-45 minutes.
    • Remove the cake pan from oven.
    • Add the basil pesto and cherry tomatoes to it and bake it again for 5 minutes
    • Transfer the mixture into serving platter and serve immediately

DSC_0549

Note :-

  • You can add red chili flakes for roasted potatoes if you want to make it spicy.
  • You can use any grilled vegetables as you like.
  • You can even parboil the potatoes and then give it a quick stir fry before adding pesto.
  • You can use potato instead of baby potatoes. Take four of them and cut it into wedges.
  • You can use any pesto other than basil. It can be homemade or ready made. But I guarantee once you try it on your own you will never turn towards the ready made ones.


DSC_0675

I can’t believe it’s August already and my Lo will soon turn 1.5 years and keeping me super duper busy. All his toddler tantrums is so overwhelming and exhausting. I was thinking of posting this recipe a month back but just could not find time to write and post the recipe. I always keep looking for vegetarian recipes that are easy to make and yummy to give any meat lovers a delight. Kebabs is one of my favorite dish, especially Chicken Kebabs. My hubby is a vegetarian so keep exploring options and try to convert non vegetarian dish into a vegetarian dish by adding some twists. This ensures that even vegetarian people can equally enjoy food as compared to non vegetarian people especially Kebabs. The type of Kebab which I am writing down make my mouth water whenever I see, eat or even dream about it. The ‘melt-in-mouth’ texture due to Paneer (cottage cheese) and regular cheese and loads of nutrition from vegetables makes it extraordinary, yummy and in way healthy. You can either pan fry or deep fry this type of Kebab. You can make the mixture one or two days ahead of party / get together and fry it on the “D day”. Its definitely a crowd winner which was evident when I won 1st prize in cooking competition at hubby’s office. This recipe is adapted from my favorite chefs website Mr Sanjeev Kapoor.
Ingredients :-

Paneer , Indian Cottage Cheese
1/2 cup
Potato, Boiled and Mashed
1 large
Carrot, Boiled and mashed
1/4 cup
Spinach, Blanched and chopped
1/4 cup
Green Peas, Boiled and mashed
1/4 cup
Cauliflower, Steamed and mashed 1/4 cup
Mozzarella Cheese, Cubed 1/4 cup
Whole wheat bread crumbs 1/2 cup
Chat Masala Powder
1 1/2 tablespoon
Garam Masala Powder
1 teaspoon
Red Chilli Powder
1/2 teaspoon
Salt
to taste
Oil
for deep/shallow frying

Method :-

  • Mix all ingredients together except mozzarella cheese, oil and bread crumbs to form a firm dough.
  • If the dough is not firm add some bread crumbs into it.
  • Keep it in refrigerator for at least one hr.
  • Divide the dough in 12-14 equal portion.
  • Make a round ball out of each equal portion and stuff one cube of mozzarella cheese into it.
  • Flatten the dough into Pattie and roll it into wheat crumbs generously.
  • Heat a non stick pan and put oil in it.
  • Shallow fry the patties into the pan until both the sides get golden brown in color.
  • You can even deep fry the patties but before that test one of the patties. If it breaks add some more breadcrumbs into the dough.

DSC_0681

Notes :-

  • You can increase/decrease the heat of chilli powder and garam masala powder depending on your taste buds.
  • You can even use toasted oats in place of whole wheat breadcrumbs.
  • Keep in mind that vegetables should not be over boiled or over steamed. Too much moisture will leads in addition of too much bread crumbs and you will loose the real taste of kebabs.
  • You can also use Ricotta Cheese instead of Paneer.
  • You can even used crushed cornflakes in place of breadcrumbs to roll the patties. It taste yummier because of crunchy cornflakes.