Posts Tagged ‘Egg’

DSC_1070.JPG
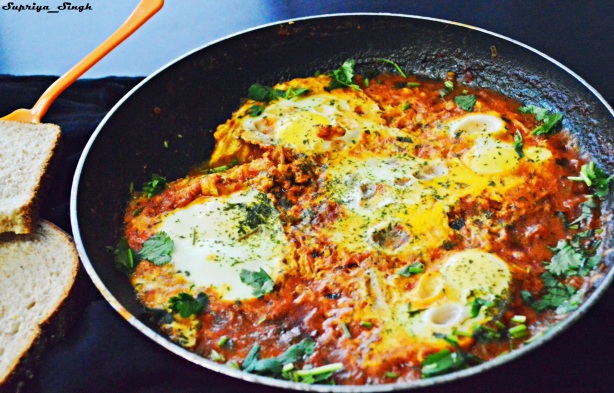
There are times when days feel long, tiring, or hectic and you really do not want feel like doing anything. You would expect someone to make a good meal for you or at least you want to cook something very quick. Luckily for those long days, Shakshuka comes to the rescue. You may or may not have heard this name before. I have eaten this dish (with different variation) few times in Pune (India). In short, this dish is a variation of an Indian egg curry without boiling eggs. Eggs are poached in flavorful juices of tomato and spices. Shakshuka is believed to be of Jewish, Tunisian or Middle Eastern origin. I have tried three versions of this dish – with feta cheese, with coconut milk and a combination of both. This is best enjoyed with bread but you can have anything like rice, roti, naan, pita bread along with it. The variation I made from the original dish is to cook eggs for a long time as I don’t like runny eggs but the original dish requires the egg to be runny and less cooked.

Ingredients :-

Eggs, large 6
Onion, large finely chopped
Red bell pepper,finely chopped
Garlic cloves, thinly sliced 3
Fresh Ginger, grated 1 tablespoon
Black Pepper 1/4 teaspoon
Green Chilies, Chopped 2
Tomatoes, finely chopped 4-5
Garam Masala 1/2 teaspoon
Coconut Milk 1/2 cup
Cilantro, Finely chopped 2 tablespoons
Turmeric powder 1/2 teaspoon
Paprika 1/2 teaspoon
Olive Oil 2 tablespoon
Salt  to taste
Parsley leaves, dried or fresh 1 tablespoon

DSC_1028.JPG

Method :-

  • Heat oil in a pan over medium heat. Add onion and bell pepper and saute it until soft.
  • Add ginger, garlic and green chilies and saute for 2 more minutes.
  • Add turmeric, black pepper, paprika and garam masala and cook it for 1 minute.
  • Add tomatoes and keep sauteing until the tomatoes get fully cooked.
  • Add coconut milk and stir it gently. Let it simmer for 5 minutes.
  • Add salt according to your taste and give it a quick stir.
  • Make well for each egg and crack the egg one by one directly into the simmering sauce. Lower the heat to medium low, cover the pan and cook the eggs until they have a faint layer of white over the yolks. I cooked it for more five minutes until the eggs are fully set. 
  • Garnish it with cilantro and dried parsley leaves over the top and enjoy it warm with any kind of bread or rice you want.

DSC_1060.JPG

Notes:-

  • You can even bake this dish once you put egg in it. For that preheat the oven to 375 degree Fahrenheit and use a oven proof skillet to cook the dish. Cook it for about 10 minutes.
  • You can add any type of cheese on top of it but feta cheese goes best with this dish.
  • Spiciness of the dish can be modified according to taste. I like to have this dish with some sprinkled red chilies on it.

Asparagus Souffle

Posted: June 8, 2013 in Baked, French
Tags: , ,

IMG_0688

My love for mother nature and its colors inspired me to cook something “green”! Colors depicts different aspects of life like sadness, joy, fear, warmth, anger, etc. This dish with bright color and bold flavor is dedicated to mother nature. After hearing Souffle for the first time, I was very skeptical about it as it sounded little weird but when I came to know more about it, I was very impressed with the preparation style and end product. Traditionally, Souffle is a French dish. Its lightly baked cake with egg yolk folded in beaten and fluffy egg whites and mixed with your choice of ingredients. You can have serve it as a savory item or as a dessert. After baking is done, its fluffy look and texture is really amazing but it slumps in about 10 minutes. In this recipe, I have used Asparagus as the main ingredient and loved the texture, color, and taste of this beautiful dish. I have adapted the idea from allrecipes.com

Ingredients :-

Asparagus, trimmed and chopped
1 bunch
Unsalted Butter
2 tablespoon
All Purpose Flour/Maida
2 tablespoon
Cold Milk
1 cup
Kosher Salt
1 teaspoon
Cayenne pepper
to taste
Garlic, Minced
2 clove
Eggs, Separated
4
Mozzarella Cheese, Grated
1/2 cup

Method :-

  • Cook asparagus in a saucepan of boiling water until bright green but still crisp, about 2 minutes. Transfer asparagus immediately to ice water to stop the cooking process. Drain and set aside.
  • Heat a pan over medium heat and add butter to it. Whisk in flour and stir until mixture becomes paste-like and light golden brown. It will take about 2 minutes.
  • Whisk milk into butter-flour mixture, bring to a simmer and cook until thick, 2 to 3 minutes. Season with salt and cayenne pepper.
  • Place milk mixture, garlic, and asparagus in a blender and puree until smooth.
  • Pour asparagus mixture into a large bowl; stir in egg yolks and Cheddar cheese.
  • Preheat oven to 375 degrees F (190 degrees C).
  • Generously butter 4 (6-ounce) ramekins,
  • Beat egg whites in a large glass or metal mixing bowl until soft peaks form. Lift your beater or whisk straight up: the egg whites will form soft mounds rather than a sharp peak.
  • Stir half of egg whites into asparagus cheese mixture until just combined. Gently fold remaining egg whites into mixture.
  • Fill prepared ramekins about 3/4 full and place on a baking sheet; bake in the preheated oven until edges are golden brown, about 20 to 25 minutes

IMG_0693

Note :-

  • Original recipe called for white Cheddar cheese. But I had Mozzarella at home so i used it.
  • In the original recipe only half garlic clove was used. But as I love more of garlic so I increased it.
  • You can try this with any pureed vegetables like broccoli, spinach, artichokes etc.
  • To make it bit more spicy you can increase the quantity of Cayenne pepper and can also some curry powder to enhance the taste of it.

hotnoodlesoup

Soup is what I crave for any time and specially in winters its a great natural remedy to fight cold or flu. Its light, hearty, fascinating and  energetic. You can use any type of  leftovers with soup and create new variations of favorite recipes, since soup lends itself to experimentation.Hot and Sour Soup is a very popular Indo-chinese soup loaded with vegetables and generally chicken. This delicious soup is a complete meal in itself and warm comfort on a chilly day. Its instantly boost your mood and very healthy as its low in fat. Enjoy!!

Ingredients:-

Egg Noodles
1 cup
Garlic ,minced
1 Tablespoon
Ginger,minced
1 tablespoon
Green Chillies, finely chopped
2-3
Carrot, chopped in cubes
1/4 cup
Green Beans, cut at an angle
1/4 cup
Celery, thinly sliced
1/4 cup
Cauliflower, finely chopped
1/2 cup
Cabbage, thinly sliced
1/2 cup
Mushroom, thinly sliced
1/4 cup
Tofu, cut in big cubes
1/2 package medium or soft
Vegetable broth/Water
4 cup
Soy Sauce
To taste
Red Chilli Sauce
To taste
Salt
To taste
Pepper Powder
To taste
Vinegar
1 Tablespoon or to taste
Oil
1 Tablespoon
Corn Starch,, mixed with a little cold water
1 Tablespoon
Spring/Green Onions, chopped at an angle
2

Method :-

  • Heat oil in a medium size pot.
  • Add Ginger, Garlic and Green Chillies and saute for 1 min.
  • Add Carrot, Green Beans, Celery, Cabbage, Cauliflower, Carrot and saute it for 2-3 minutes.
  • Add vegetable broth,salt,black pepper and Egg noodles.
  • Bring the mixture to a boil and simmer till noodles are tender but not overcooked.
  • Add Mushroom,half of spring onions,Chili Sauce, Soy Sauce and Vinegar. Bring to a boil.
  • Mix 2-3 Tbsp water with the Corn Starch and add it to the soup – bring to a boil.
  • Add tofu cubes in the soup and let it simmer for 1 more minute.
  • Garnish with spring onion and serve hot.

hotnoodlesoup1

Note :-

  • For vegans use Wheat Noodles.
  • You can also add beaten Egg in the soup stirring continuous to form strands.
  • The same soup can be made into a non-vegetarian version. Use Chicken Broth and add cooked, shredded chicken with the mushrooms.
  • Corn Starch is basically used as thickener so use it depending on your consistency.
  • You can increase/decrease the quantity of green chillies depending on the spiciness level you want.

???????????????????????????????

Anyone from Kolkatta or Bengal can easily associate with this tasty snack sold on every corner of street. Its a complete meal. While we (me n my brothers) were small it was compulsion for us to have it in winters on every Saturday evening. This egg roll is not the regular Chinese crispy version which we generally come around here in US. Very different from that this egg roll is made of egg layered on a flat bread (roti) made of wheat flour or all purpose flour(maida) with crunchy vegetables and sauces added and rolled into wrap. This Egg Roll in Kolkatta is very close to Frankie in Mumbai ot Kathi Roll in many cities of India. Its very easy to make and delicious to eat.
Ingredients :-

All purpose flour/Wheat flour
1 cup and 1/2 cup for dusting
Eggs
4 medium
Red Onion, finely chopped
1 medium
Green Chillies, finely chopped
2-3
Cucumber,peeled and cut into thin strips
1 small
Lemon Juice
As required
Ketchup
As required
Green Chilli Sauce
As required
Water
To knead the flour
Salt
to taste
Pepper Powder
A pinch per roll
Oil
For frying

Method :-

For Paranthas

  • Knead the flour on a large bowl by adding water gradually to make a smooth dough.Keep aside for 30 mins.
  • Punch down the dough and knead it again. Divide the dough into 4 equal proportion and shape into balls.
  • Heat a griddle/pan for 2-3 minutes.
  • In the meantime take the dough ball, flatten it and roll it into six inch circle with the help of dusting.
  • Cook the rolled dough lightly (on medium heat) on both sides. When you see tiny brown spots appearing on the surface, reduce the heat and brush on about half to one teaspoon of oil and flip it over.
  • Cook till both sides of rolled dough have few brown spots on each side. Try not to crisp the parantha as it gets to difficult to roll them up.
  • Remove it from the pan and keep it on absorbent paper.

Adding Egg to Paranthas –

  • Break the eggs in a bowl and add salt as per taste. Beat the eggs. Divide the mixture into four equal proportions and keep aside.
  • In the same heated griddle/pan add 1/8 tsp oil and spread it.
  • Pour 1 portion of egg in the pan and spread it so that it has the same diameter as parantha.
  • Place 1 parantha on the egg mixture in the pan before egg sets. Lightly press the parantha on the egg mixture so that egg sticks to the parantha. Cook for 10-15 secs. Flip and cook it for other 10-15 secs.
  • Remove it from griddle/pan.
  • Repeat the same procedure for other egg and paranthas.

IMG_0014

Assembling the Egg Roll –

  • Place the egg covered parantha on flat surface with egg side up.
  • Place the sliced onion,cucumber,chillies along the diameter of the parantha. Sprinkle some salt and pepper as taste. Drizzle lemon juice,tomato ketchup and green chilli sauce as needed.
  • Roll the paranthas add wrap the bottom half of each parantha in a foil or tissue paper. Tuck the paper well so that roll does not open up.
  • Egg Rolls in Kolkatta style are ready to serve.

Note –

  • For non vegetarian you can add fillings of chicken, fish, mutton in a way you like.
  • You can also add shredded radish, carrot and cabbage for extra crunch.
  • The paranthas should not be very thin. It should have some good amount of bite to it. You can use store bought paranthas or tortillas too but the egg roll will not taste as good as with homemade paranthas.

???????????????????????????????

Marble Cake and the Perfectness!

Posted: July 22, 2012 in Cakes
Tags: , ,

Cake!! A Birthday cake, a wedding cake , a new born arrival cake , a cake for every other festive occasion and for a good reason. Any variety of cake , name it –  Bundt cake, Loaf cake, Pound cake, Cheesecake, at the end of a meal always elicit attention and admiration. After trying hard and hard I came to know that cake recipes don’t have to be fussy and difficult (as I use to assume that). Baking cake is both an art and science. It can be fun and simple , carefully  follow the instructions and use the right equipments. Marble cake has always fantasize me through its marvelous swirls. I use to think how the hell in the world can anyone bake this. There might be any high fundoo equipment to make it. Silly me! Now I know the secret. You only need the recipe, equipments and one knife 🙂 . This is one cake which looks so beautiful without frosting and taste best with coffee and tea.

Ingredients:-

Unsalted Butter, room temperature 1/2 Cup/1 stick plus more for pan
Cake flour/All purpose flour/Maida 1 and 3/4 Cup
Baking Powder 2 teaspoon leveled
Salt 1/2 teaspoon
Sugar 1 cup
Eggs, room temperature
3 large
Vanilla extract 1 teaspoon
Buttermilk/Milk 3/4 cup
Cocoa powder(I used Hershey’s)
1/4 cup plus 1 tablespoon
Boiling Water 1/4 cup plus 2 tablespoon


Method :-

  • Preheat oven to 350 degrees F (180 degrees C). Grease a 9 by 5 loaf pan with unsalted butter. Set aside.
  • Sieve/Sift the flour, baking powder and salt together. Sifting helps in aerating the flour and breaks up the clumps/lumps.
  • In a bowl, with the help of electric hand mixer beat the butter and sugar together until it becomes light and fluffy. It took me about 10 minutes. Timing depends on the power of your electric mixer.
  • Add eggs to this mixture, one at a time beating until combined and scraping down the sides of bowl as needed. Mix in vanilla essence.
  • Add flour mixture in 3 batches, alternating with the milk/buttermilk, beginning and ending with the flour. Mix well after each addition. Set aside 1/3 rd of batter.
  • Mix the cocoa powder and boiling water in a separate bowl with the help of rubber spatula until the mixture becomes smooth. Add this cocoa mixture to the reserved batter (1/3rd batter). Stir gently until well combined.
  • Spoon batter in the prepared loaf  pan in 2 layers, alternatively making a checkerboard. Use big spoon for the white batter and small spoon for chocolate batter. To create marbling effects, run a knife through the batters in a swirling motion. Gently tap the pan for couple of times to get rid off the air bubbles. Note :- If you don’t get this step you can search on YouTube “How to marble cake”.  I personally followed this video to create marble effect. Only change was that I used Loaf cake pan. I will soon come up with my own images for creating marble effect. Sorry for this 😦 , as I  forgot to take the pictures of process while making the cake.  ” A picture is worth a thousand words”.
  • Bake for 40-45 minutes or until a tester inserted comes out clean. You can use toothpick as a tester to check. Insert the toothpick in center of the cake and if it comes out clean i.e no wet batter stick to it, cake is done. Don’t use knife to check as it can deflate the cake.
  • Take out the cake and leave it for cooling while still in the pan for 10 minutes. Turn out cake from pan and cool it completely on wire rack. You can store this cake at room temperature  for 3 days in an air tight container.

Handy Tips For Cake Baking :-

  • Have all ingredients at room temperature if its mentioned in the recipe. This is very important for butter and eggs. Soft butter makes batter smooth and loafy cake. Double check the recipe concerning egg as some recipe require it cold and some at room temperature.
  • Before preparing for the batter preheat the oven. A batter will not react properly to heat if it sits for 10 minutes at room temperature waiting for oven to heat.
  • Measure the ingredients as accurately as possible and use them in the order specified.
  • Place the pans on center rack of the preheated oven. Do not allow the pans to touch each other or the oven walls.